Homemade Bread
Baking homemade bread is a delightful experience that fills your kitchen with warmth and the irresistible aroma of fresh bread. It’s not just about the end product; it’s about the journey of creating something special with your own hands. Whether you’re a seasoned baker or a beginner, making bread at home can be both fun and rewarding.
The Joy of Baking Homemade Bread
There’s something magical about kneading dough and watching it rise. The process can be therapeutic, allowing you to unwind and focus on the task at hand. As you mix the ingredients, you engage all your senses. The feel of the flour, the warmth of the water, and the smell of yeast coming to life create a unique experience. Plus, the satisfaction of pulling a golden loaf from the oven is unmatched!
Why Choose Homemade Bread?
Choosing to bake homemade bread offers numerous benefits. First, you control the ingredients, ensuring that your bread is free from preservatives and artificial additives. This means you can enjoy a healthier option that suits your dietary needs. Additionally, homemade bread is often fresher and tastier than store-bought varieties. You can experiment with flavors and textures, creating a loaf that’s uniquely yours.
Moreover, baking bread can be a wonderful way to bond with family and friends. Imagine gathering around the kitchen, sharing stories, and enjoying the process together. It’s a perfect opportunity to teach children about cooking and the joy of creating something from scratch. So, roll up your sleeves and get ready to embark on this delicious adventure of making homemade bread!
Ingredients for Homemade Bread
To create the perfect loaf of homemade bread, you need a few essential ingredients. Each component plays a vital role in the texture and flavor of the bread. Let’s take a closer look at what you’ll need to get started.
Essential Ingredients for Homemade Bread
- All-Purpose Flour: This is the backbone of your bread. It provides structure and helps the bread rise. You’ll need about 3 1/4 cups for a standard loaf.
- Instant Yeast: Yeast is what makes your bread rise. One packet, which is about 2 1/4 teaspoons, is perfect for this recipe. Instant yeast is convenient because it doesn’t need to be activated in water first.
- Sugar: Just a tablespoon of sugar adds a touch of sweetness and helps feed the yeast, promoting a good rise.
- Salt: Salt enhances the flavor of the bread. You’ll need one teaspoon to balance the sweetness and improve the overall taste.
- Warm Water: The water should be about 110°F. This warmth activates the yeast, helping it to work effectively. You’ll need 1 1/4 cups.
- Olive Oil: Two tablespoons of olive oil add moisture and richness to the bread, making it soft and flavorful.
Optional Add-ins for Homemade Bread
While the basic recipe is fantastic on its own, you can customize your homemade bread with various add-ins. Here are some ideas:
- Herbs: Fresh or dried herbs like rosemary, thyme, or basil can add a delightful flavor.
- Seeds: Consider adding sesame, poppy, or sunflower seeds for a crunchy texture.
- Nuts: Chopped walnuts or pecans can give your bread a nutty flavor and added nutrition.
- Cheese: Shredded cheese, like cheddar or parmesan, can create a savory twist.
- Dried Fruits: Raisins or cranberries can add a sweet touch, perfect for breakfast or snacking.
Feel free to experiment with these optional ingredients to create a loaf that suits your taste. The beauty of homemade bread is that you can make it uniquely yours!
Step-by-Step Preparation of Homemade Bread
Now that you have your ingredients ready, it’s time to dive into the step-by-step preparation of your homemade bread. Each step is crucial in creating a delicious loaf that you and your loved ones will enjoy. Let’s get started!
Step 1: Mix the Dough for Homemade Bread
Begin by gathering a large mixing bowl. In this bowl, combine the all-purpose flour, instant yeast, sugar, and salt. It’s important to mix these dry ingredients well. This ensures that the yeast and salt are evenly distributed throughout the flour. Next, gradually add the warm water and olive oil. Use a wooden spoon or spatula to stir until a shaggy dough forms. This dough will look a bit messy, but that’s perfectly normal!
Step 2: Knead the Dough for Homemade Bread
Once your dough is mixed, it’s time to knead! Transfer the shaggy dough onto a lightly floured surface. Kneading is essential as it develops the gluten, giving your bread its structure. Knead the dough for about 8-10 minutes. You want it to become smooth and elastic. If the dough feels too sticky, sprinkle a little more flour as needed. Remember, the goal is to create a soft, pliable dough that springs back when poked.
Step 3: First Rise of Homemade Bread
After kneading, place your dough in a lightly greased bowl. Cover it with a clean kitchen towel or plastic wrap. This helps keep the dough warm and moist. Let it rise in a warm place for about 1 hour. You’ll know it’s ready when it has doubled in size. This first rise is crucial as it allows the yeast to work its magic, creating air bubbles that make your bread light and fluffy.
Step 4: Shape the Bread
Once the dough has risen, it’s time to shape it. Gently punch down the dough to release the air. This step is important as it helps to redistribute the yeast. Transfer the dough back to a floured surface and shape it into a loaf or your desired shape. Place the shaped dough into a greased loaf pan or onto a baking sheet. Make sure it’s snug but not too tight, allowing room for the second rise.
Step 5: Second Rise of Homemade Bread
Cover the shaped dough again with a towel. Let it rise for an additional 30-45 minutes. During this time, the dough will puff up again. This second rise is essential for achieving that perfect texture. You want the dough to feel light and airy before baking.
Step 6: Preheat and Bake Homemade Bread
While the dough is rising, preheat your oven to 375°F (190°C). This ensures that your bread bakes evenly. Once the dough has risen, it’s time to bake! Place the dough in the preheated oven and bake for 25-30 minutes. You’ll know it’s done when the bread is golden brown and sounds hollow when tapped on the bottom. The aroma will fill your kitchen, making it hard to wait!
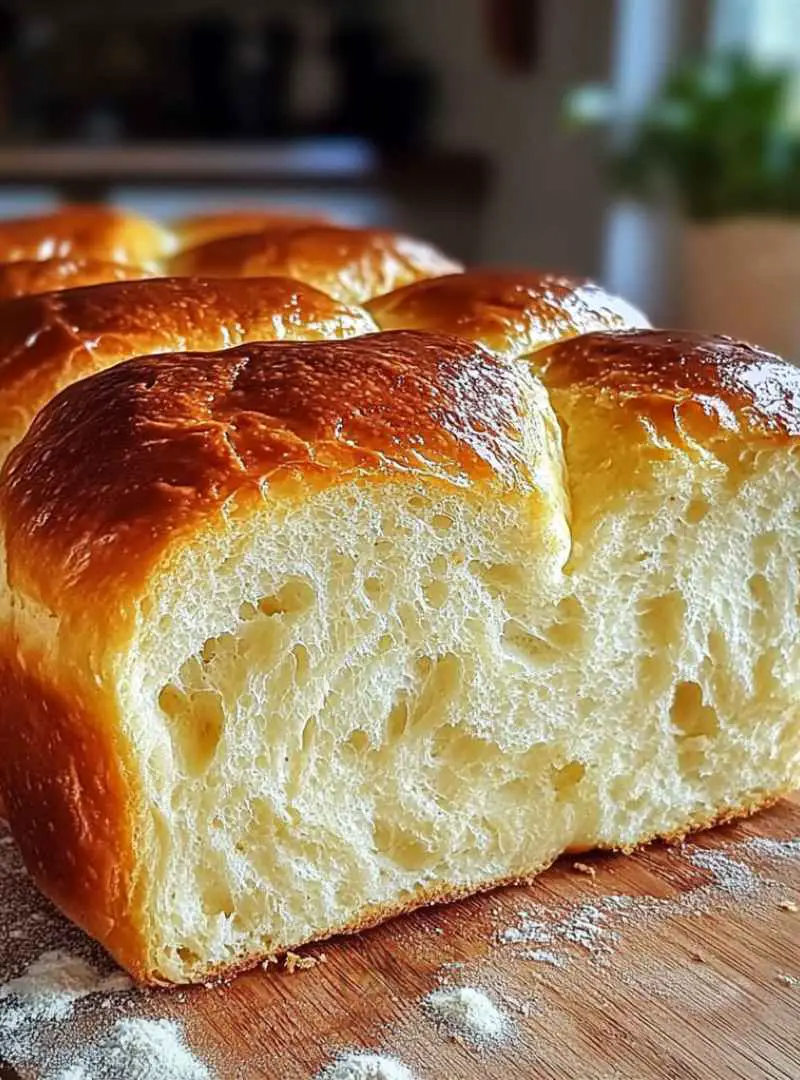
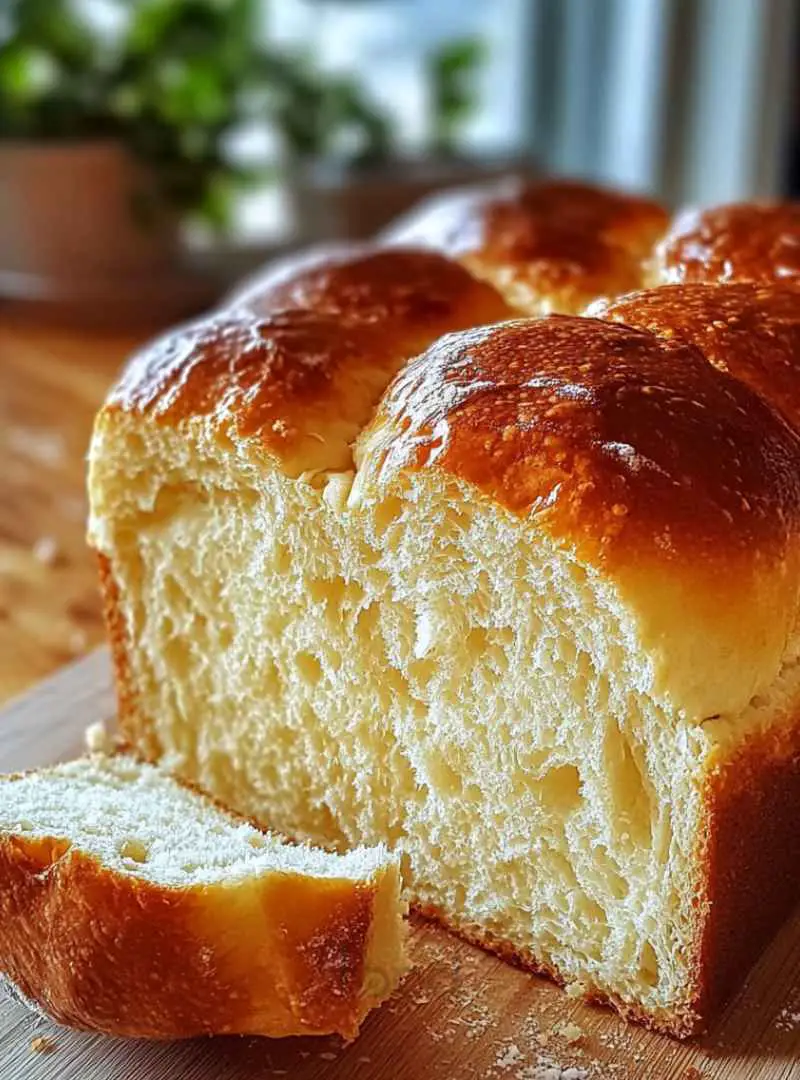
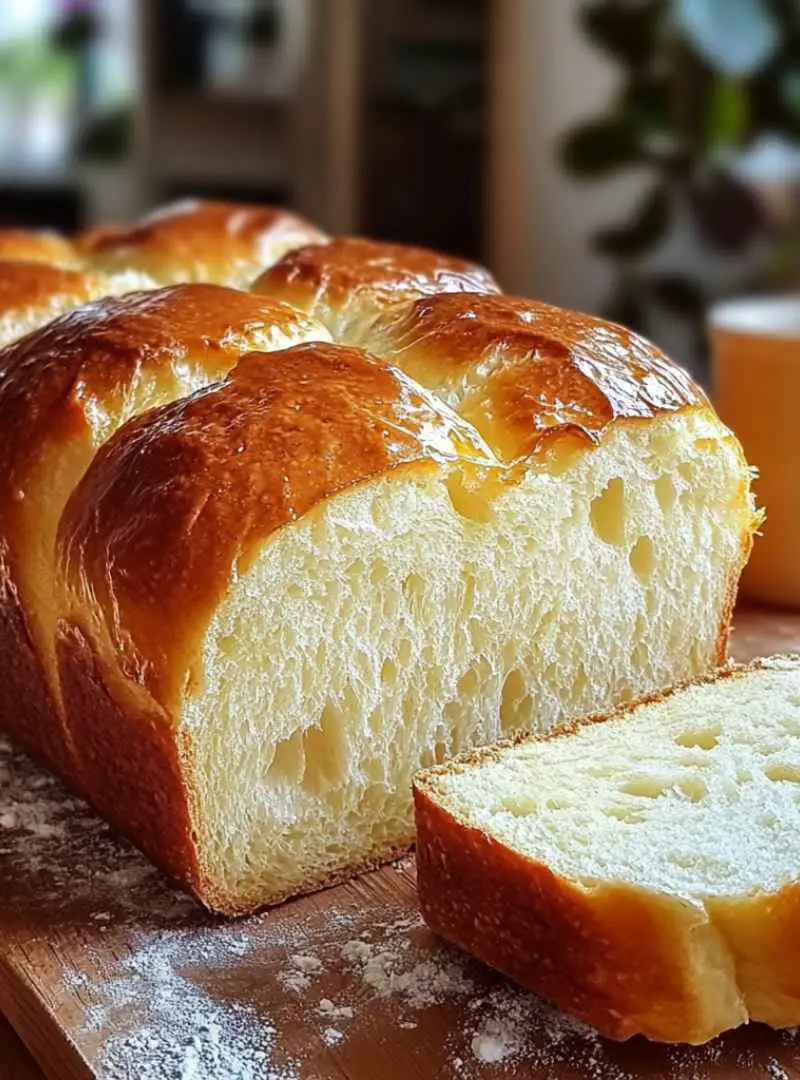
Step 7: Cool and Serve Homemade Bread
After baking, remove the bread from the oven. Let it cool in the pan for about 10 minutes. This cooling period allows the bread to set. Then, transfer it to a wire rack to cool completely before slicing. Slicing too soon can make the bread gummy. Once cooled, enjoy your homemade bread fresh or store it for later!
Variations of Homemade Bread
Once you’ve mastered the basic recipe for homemade bread, you might want to explore different variations. Each type of bread offers unique flavors and textures, allowing you to enjoy a variety of delicious options. Here are some popular variations to consider:
Whole Wheat Homemade Bread
If you’re looking for a healthier option, whole wheat homemade bread is a fantastic choice. By substituting all-purpose flour with whole wheat flour, you add more fiber and nutrients to your bread. Start with 2 cups of whole wheat flour and mix it with 1 1/4 cups of all-purpose flour for the best results. This combination helps maintain a light texture while boosting the nutritional value. The process remains the same, but you may need to add a bit more water since whole wheat flour absorbs more moisture.
Herb-Infused Homemade Bread
For those who love a burst of flavor, herb-infused homemade bread is a delightful option. You can add fresh or dried herbs to your dough during the mixing stage. Popular choices include rosemary, thyme, or basil. About 2 tablespoons of chopped fresh herbs or 1 tablespoon of dried herbs will do the trick. This variation not only enhances the taste but also fills your kitchen with a wonderful aroma as it bakes. Serve it alongside soups or salads for a perfect pairing!
Sweet Homemade Bread Variations
If you have a sweet tooth, consider making sweet homemade bread. You can transform your basic recipe by adding ingredients like cinnamon, sugar, or dried fruits. For a cinnamon swirl bread, mix 1/4 cup of sugar with 2 teaspoons of cinnamon and sprinkle it over the dough before rolling it up. You can also fold in raisins or cranberries for a fruity twist. This sweet variation is perfect for breakfast or as a delightful snack with tea or coffee.
Feel free to experiment with these variations or create your own! The beauty of homemade bread lies in its versatility, allowing you to tailor each loaf to your taste preferences.
Cooking Note for Homemade Bread
Baking homemade bread can be a rewarding experience, but it’s important to avoid common pitfalls that can lead to disappointing results. Here are some mistakes to watch out for when making your delicious loaf.
Common Mistakes to Avoid When Making Homemade Bread
- Using Old Yeast: Always check the expiration date on your yeast. Old yeast may not activate properly, leading to dense bread. Fresh yeast is key for a good rise.
- Not Measuring Ingredients Accurately: Baking is a science. Use measuring cups and spoons for accuracy. Too much flour can make your bread dry, while too little can result in a sticky mess.
- Skipping the Kneading Step: Kneading develops gluten, which gives bread its structure. Skipping this step can lead to a flat loaf. Make sure to knead for the recommended time.
- Over or Under Rising: Allowing the dough to rise too long can cause it to collapse. Conversely, not letting it rise enough can result in a dense texture. Keep an eye on the dough and trust your senses.
- Baking at the Wrong Temperature: Always preheat your oven. Baking at the wrong temperature can affect the crust and texture. Use an oven thermometer if needed to ensure accuracy.
- Slicing Too Soon: It’s tempting to slice into warm bread, but cutting too early can make it gummy. Allow the bread to cool completely for the best texture.
By being mindful of these common mistakes, you can improve your bread-making skills and enjoy a perfect loaf every time. Happy baking!
Serving Suggestions for Homemade Bread
Now that you’ve baked a delicious loaf of homemade bread, it’s time to think about how to enjoy it! Homemade bread is incredibly versatile and can be paired with a variety of dishes or served in creative ways. Here are some delightful serving suggestions to enhance your bread experience.
Best Pairings for Homemade Bread
Homemade bread pairs wonderfully with many foods. Here are some classic combinations:
- Soups: A warm bowl of soup is perfect with fresh bread. Try pairing your homemade bread with tomato soup, chicken noodle, or a hearty vegetable stew.
- Salads: Serve slices of bread alongside a fresh salad. It’s great for soaking up dressings and adds a satisfying crunch to your meal.
- Cheese: Create a delightful cheese platter with your homemade bread. Pair it with soft cheeses like brie or sharp cheeses like cheddar for a tasty snack.
- Spreads: Enjoy your bread with various spreads. Butter, hummus, or avocado spread can elevate your bread to a whole new level.
- Sandwiches: Use your homemade bread to make delicious sandwiches. Fill them with your favorite meats, cheeses, and veggies for a satisfying lunch.
Creative Ways to Serve Homemade Bread
Get creative with how you serve your homemade bread! Here are some fun ideas:
- Bruschetta: Top slices of toasted homemade bread with diced tomatoes, basil, and a drizzle of olive oil for a fresh appetizer.
- French Toast: Use your homemade bread to make delicious French toast. Dip slices in a mixture of eggs and milk, then cook until golden brown.
- Garlic Bread: Spread butter mixed with minced garlic and herbs on slices of bread. Toast them in the oven for a tasty side dish.
- Croutons: Cut leftover bread into cubes, toss with olive oil and seasonings, then bake until crispy. Use them to top salads or soups.
- Bread Pudding: Transform stale bread into a sweet dessert by making bread pudding. Combine with eggs, milk, sugar, and spices, then bake until set.
With these serving suggestions, you can enjoy your homemade bread in many delightful ways. Whether you’re having a cozy dinner or a casual lunch, your fresh bread will surely impress!
Tips for Perfect Homemade Bread
To achieve the best results when baking homemade bread, a few tips can make a significant difference. From kneading techniques to rising methods, these insights will help you create a perfect loaf every time. Let’s explore some essential tips for perfect homemade bread!
Tips for Kneading Homemade Bread
Kneading is a crucial step in bread-making. Here are some tips to ensure you knead effectively:
- Use the Right Surface: Knead on a clean, flat surface. A wooden or marble countertop works well. This provides a sturdy base for your dough.
- Don’t Overdo It: Knead just until the dough is smooth and elastic. Over-kneading can make the bread tough. Aim for about 8-10 minutes.
- Use the “Push and Fold” Method: Push the dough away from you with the heel of your hand, then fold it back over itself. Rotate the dough a quarter turn and repeat. This method helps develop gluten effectively.
- Keep Your Hands Floured: Lightly flour your hands to prevent sticking. However, avoid adding too much flour, as it can dry out the dough.
Tips for Rising Homemade Bread
The rising process is vital for achieving a light and airy loaf. Here are some tips to help your dough rise perfectly:
- Find a Warm Spot: Yeast thrives in warmth. Place your dough in a warm, draft-free area. An oven with the light on or a sunny spot works well.
- Cover the Dough: Always cover your dough with a towel or plastic wrap. This keeps it warm and prevents it from drying out.
- Be Patient: Don’t rush the rising process. Allow the dough to double in size. This can take longer in cooler temperatures, so be patient!
- Check for Readiness: To test if the dough has risen enough, gently poke it with your finger. If the indentation remains, it’s ready for shaping.
Tips for Storing Homemade Bread
Once you’ve baked your delicious homemade bread, proper storage is key to keeping it fresh. Here are some tips for storing your bread:
- Cool Completely: Always let your bread cool completely before storing. This prevents moisture buildup, which can lead to mold.
- Use a Bread Box: Store your bread in a bread box or a paper bag. This allows for airflow while keeping it fresh.
- Plastic Wrap for Short-Term: If you plan to eat the bread within a few days, wrap it in plastic wrap. This helps retain moisture.
- Freeze for Long-Term: For longer storage, slice the bread and freeze it. Place slices in a freezer bag, and you can toast them directly from the freezer.
By following these tips, you’ll be well on your way to baking perfect homemade bread every time. Enjoy the process and the delicious results!
Breakdown of Time for Homemade Bread
Understanding the time involved in making homemade bread can help you plan your baking session better. Each stage of the process requires a specific amount of time, from preparation to baking. Here’s a detailed breakdown of the time needed for each step.
Prep Time for Homemade Bread
The prep time for homemade bread is relatively short. You’ll spend about 15 minutes gathering your ingredients and mixing the dough. This includes measuring the flour, yeast, sugar, salt, and oil, as well as combining them with warm water. It’s a quick and straightforward process that sets the stage for your delicious loaf!
Cooking Time for Homemade Bread
Once your dough has risen and is shaped, the cooking time is approximately 30 minutes. This includes the time it takes for the bread to bake in the preheated oven at 375°F (190°C). During this time, the bread will develop a beautiful golden crust and a delightful aroma that fills your kitchen.
Total Time for Homemade Bread
When you add up the prep time, the first rise, the second rise, and the baking time, the total time for making homemade bread is about 2 hours and 30 minutes. This includes:
- Prep Time: 15 minutes
- First Rise: 1 hour
- Second Rise: 30-45 minutes
- Bake Time: 30 minutes
While the total time may seem lengthy, much of it is hands-off. You can use the rising periods to clean up, prepare other dishes, or simply relax. The joy of homemade bread is well worth the wait!
Nutritional Information for Homemade Bread
Understanding the nutritional content of your homemade bread can help you make informed choices about your diet. While homemade bread is a delicious treat, it also provides essential nutrients. Let’s break down the nutritional information for a standard slice of homemade bread.
Calories in Homemade Bread
A typical slice of homemade bread contains about 80-100 calories. This can vary based on the ingredients you use, such as the type of flour or any add-ins like seeds or nuts. If you’re watching your calorie intake, consider how many slices you enjoy and adjust your portion sizes accordingly. Remember, homemade bread is a wholesome option that can fit into a balanced diet!
Protein Content in Homemade Bread
Protein is an essential nutrient that helps build and repair tissues. Each slice of homemade bread typically contains around 3-4 grams of protein. The protein content can increase if you use whole wheat flour or add ingredients like seeds or nuts. Including protein-rich toppings, such as nut butter or cheese, can further enhance the nutritional value of your meal.
Sodium Levels in Homemade Bread
Sodium is an important mineral, but it’s essential to consume it in moderation. A slice of homemade bread usually contains about 150-200 milligrams of sodium, depending on the amount of salt you add during preparation. If you’re watching your sodium intake, you can reduce the salt in the recipe without significantly affecting the bread’s texture. Just be mindful of the toppings you choose, as they can add extra sodium.
By being aware of the nutritional information, you can enjoy your homemade bread while maintaining a balanced diet. It’s a delicious way to nourish your body and satisfy your cravings!
FAQs About Homemade Bread
How long does homemade bread last?
Homemade bread is best enjoyed fresh, but it can last for several days when stored properly. Typically, it will stay fresh for about 3-5 days at room temperature. To keep it from drying out, store it in a bread box or wrap it in a clean kitchen towel. If you notice any signs of mold, it’s best to discard the bread. For longer storage, consider freezing it.
Can I freeze homemade bread?
Yes, you can freeze homemade bread! Freezing is a great way to preserve its freshness. To freeze, slice the bread and place the slices in a freezer bag. Make sure to remove as much air as possible to prevent freezer burn. You can toast the slices directly from the freezer, making it a convenient option for quick meals or snacks.
What can I do if my homemade bread doesn’t rise?
If your homemade bread doesn’t rise, it could be due to a few reasons. First, check if your yeast is fresh and active. If it’s expired, it won’t work properly. Also, ensure that the water you used was warm enough to activate the yeast but not too hot, as that can kill it. If your dough is too cold, it may take longer to rise. Try placing it in a warmer spot to encourage rising.
How do I know when homemade bread is done baking?
To determine if your homemade bread is done baking, look for a golden-brown crust. You can also tap the bottom of the loaf; if it sounds hollow, it’s likely ready. Additionally, using a thermometer can help. The internal temperature of the bread should be around 190°F (88°C) when fully baked. If you follow these tips, you’ll enjoy perfectly baked homemade bread every time!
Conclusion on Homemade Bread
Recap of the Benefits of Homemade Bread
In conclusion, baking homemade bread is a rewarding experience that offers numerous benefits. First and foremost, you have complete control over the ingredients. This means you can create a healthier loaf, free from preservatives and artificial additives. Additionally, the taste of fresh, warm bread straight from your oven is simply unbeatable. The aroma that fills your kitchen while baking is a delightful bonus!
Moreover, making homemade bread can be a wonderful bonding activity. Whether you’re baking with family or friends, it’s a chance to share stories and create lasting memories. The process of kneading, rising, and shaping the dough can be both therapeutic and satisfying. Plus, the joy of slicing into a freshly baked loaf is a reward in itself!
Encouragement to Try Baking Homemade Bread
If you haven’t tried baking homemade bread yet, now is the perfect time to start! With simple ingredients and easy-to-follow steps, you can create a delicious loaf that will impress everyone. Don’t be afraid to experiment with different flavors and variations. Whether you prefer classic white bread, whole wheat, or herb-infused options, the possibilities are endless.
So, gather your ingredients, roll up your sleeves, and embark on this delightful baking adventure. You’ll not only enjoy the fruits of your labor but also gain a new skill that you can share with others. Happy baking, and may your homemade bread bring warmth and joy to your table!
Homemade Bread
Ingredients
Equipment
Method
- In a large mixing bowl, combine the all-purpose flour, instant yeast, sugar, and salt. Mix well.
- Gradually add the warm water and olive oil, stirring until a shaggy dough forms.
- Transfer the dough onto a lightly floured surface and knead for about 8-10 minutes until smooth and elastic.
- Place the kneaded dough in a lightly greased bowl, cover it, and let it rise in a warm place for about 1 hour or until doubled in size.
- Gently punch down the dough, shape it into a loaf, and place it in a greased loaf pan.
- Cover the shaped dough and let it rise for an additional 30-45 minutes.
- Preheat the oven to 375°F (190°C). Bake the bread for 25-30 minutes until golden brown.
- Remove the bread from the oven and let it cool in the pan for 10 minutes before transferring it to a wire rack to cool completely.