Mini King Cakes Recipe
Mini King Cakes are delightful treats that bring joy to any celebration. These small, sweet pastries are not only delicious but also carry a rich history. They are often associated with festive occasions, especially during Mardi Gras. With their soft dough, sweet filling, and colorful glaze, Mini King Cakes are sure to impress your family and friends.
What are King Cakes?
King Cakes are a traditional pastry that originated in France. They are typically made to celebrate the Epiphany, marking the arrival of the Three Wise Men. The cake is often shaped in a circle, symbolizing the unity of the season. Inside, a small figurine or bean is hidden, and the person who finds it is crowned king or queen for the day. This fun tradition has evolved, and now, King Cakes come in various sizes and flavors, including our delightful Mini King Cakes.
The Significance of King Cakes in Celebrations
King Cakes hold a special place in many cultures, especially in New Orleans. They are a staple during Mardi Gras, where friends and families gather to enjoy this festive treat. The vibrant colors of purple, green, and gold represent justice, faith, and power, respectively. Sharing a King Cake is a way to celebrate togetherness and joy. With Mini King Cakes, you can easily share this tradition with everyone at your gathering, making each bite a celebration of flavor and fun!
Ingredients for Mini King Cakes Recipe
To create your delightful Mini King Cakes, you’ll need a few simple ingredients. Each component plays a vital role in achieving that perfect balance of flavor and texture. Here’s what you’ll need:
For the Dough:
- 2 cups all-purpose flour
- 1/4 cup granulated sugar
- 1/2 teaspoon salt
- 1 packet (2 1/4 teaspoons) active dry yeast
- 1/2 cup milk, warmed
- 1/4 cup unsalted butter, melted
- 1 large egg
- 1 teaspoon vanilla extract
Filling:
- 1/2 cup brown sugar
- 1 tablespoon ground cinnamon
- 1/4 cup unsalted butter, softened
- 1/2 cup chopped pecans (optional)
- 1/2 cup raisins (optional)
Glaze:
- 1 cup powdered sugar
- 2 tablespoons milk
- 1/2 teaspoon vanilla extract
- Colored sugar sprinkles (purple, green, and gold)
These ingredients come together to create a soft, sweet dough filled with a delightful mixture of cinnamon and sugar. The glaze adds a finishing touch, making your Mini King Cakes not only tasty but visually appealing as well. Gather these ingredients, and you’re ready to start your baking adventure!
Step-by-Step Preparation of Mini King Cakes Recipe
Now that you have gathered all your ingredients, it’s time to dive into the fun part—preparing your Mini King Cakes! Follow these simple steps to create a batch of delightful treats that will surely impress everyone.
Step 1: Preparing the Dough
First, let’s make the dough. In a large mixing bowl, combine the all-purpose flour, granulated sugar, and salt. These dry ingredients will form the base of your dough. In a separate bowl, mix the warm milk with the active dry yeast. Allow it to sit for about 5 minutes until it becomes frothy. This step is crucial as it activates the yeast, helping your dough rise.
Next, add the melted butter, egg, and vanilla extract to the yeast mixture. Stir well to combine. Now, pour this mixture into the bowl with the dry ingredients. Mix everything together until a dough forms. Once combined, turn the dough onto a floured surface and knead it for about 5-7 minutes. You want it to be smooth and elastic. After kneading, place the dough in a greased bowl, cover it with a cloth, and let it rise in a warm place for about 1 hour or until it doubles in size.
Step 2: Making the Filling
While the dough is rising, you can prepare the filling. In a small bowl, mix together the brown sugar, ground cinnamon, and softened butter. This mixture will create a sweet and aromatic filling. If you like, you can add chopped pecans and raisins for extra flavor and texture. Stir until everything is well combined, and set it aside for later use.
Step 3: Shaping the Mini King Cakes
Once your dough has risen, it’s time to shape the mini king cakes. Start by punching down the dough to release any air bubbles. Then, roll it out on a floured surface into a rectangle about 1/4 inch thick. Spread the filling mixture evenly over the dough, making sure to cover every corner. Now, roll the dough tightly from one long side to the other to form a log.
Next, cut the log into 1-inch thick pieces. Place these pieces cut-side up in a greased muffin tin. This will give your mini king cakes their lovely shape as they bake.
Step 4: Baking the Mini King Cakes
Before baking, cover the muffin tin with a cloth and let the mini king cakes rise for another 30 minutes. This second rise will make them fluffy and light. While they are rising, preheat your oven to 350°F (175°C). Once the mini king cakes have risen, bake them for 15-20 minutes or until they are golden brown. When done, remove them from the oven and let them cool slightly.
Step 5: Preparing the Glaze
While the mini king cakes are cooling, it’s time to prepare the glaze. In a small bowl, whisk together the powdered sugar, milk, and vanilla extract until smooth. This glaze will add a sweet finish to your cakes, making them even more delightful.
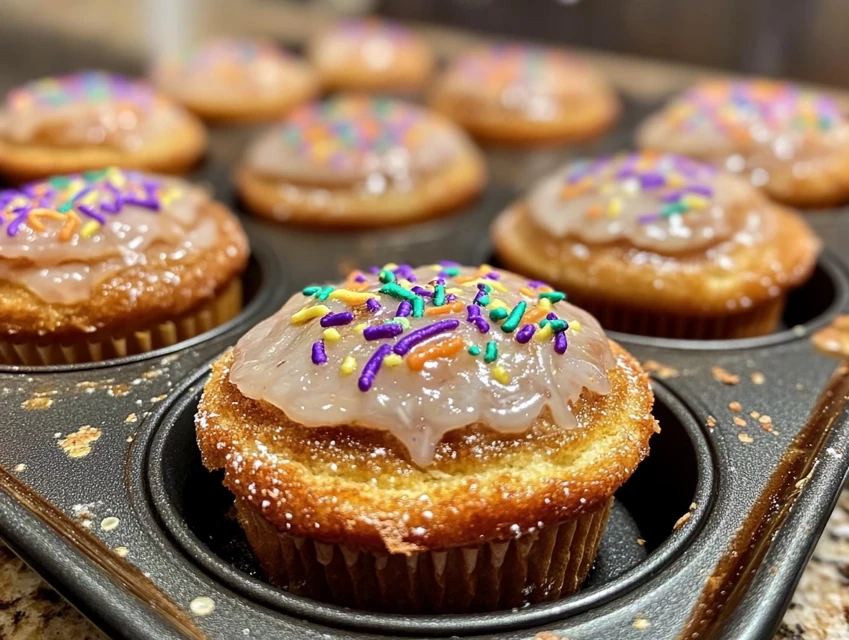
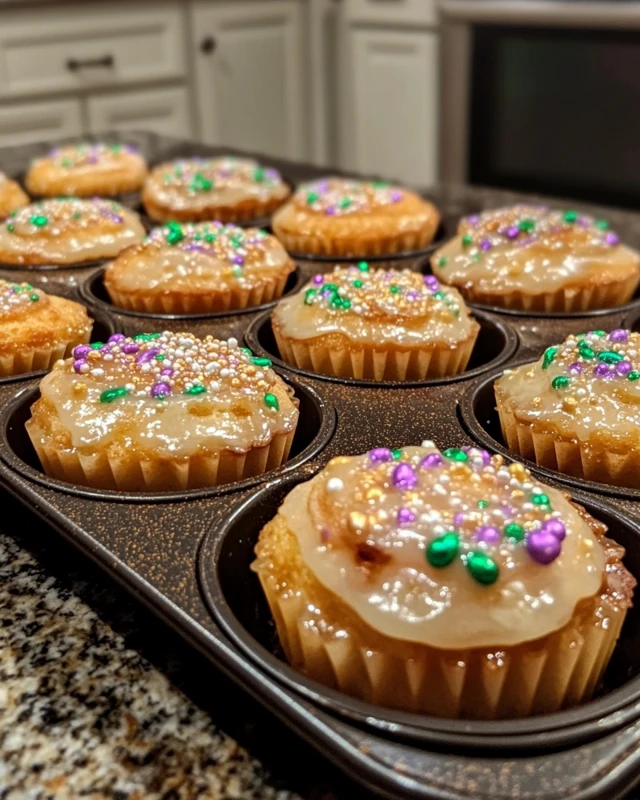
Step 6: Decorating the Mini King Cakes
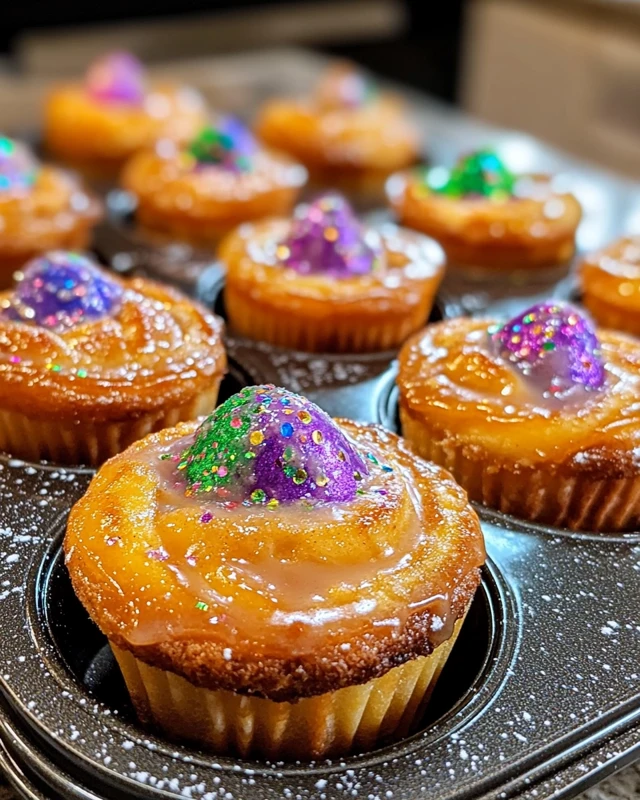
Finally, it’s time to decorate! Drizzle the glaze over the warm mini king cakes. Be generous, as this will enhance their sweetness. Immediately sprinkle the colored sugar sprinkles on top. Use purple, green, and gold to celebrate the festive spirit of King Cakes. Your Mini King Cakes are now ready to be enjoyed!
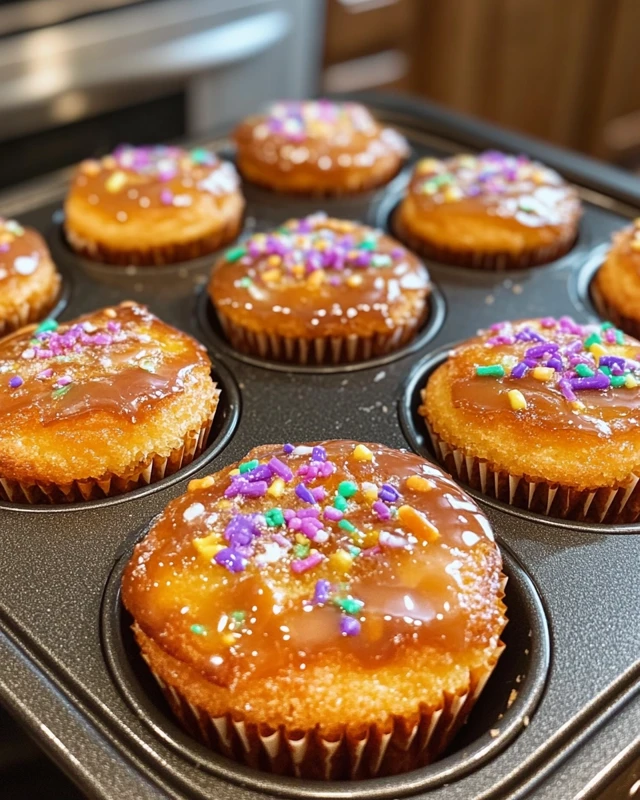
Variations of Mini King Cakes Recipe
While the classic Mini King Cakes are delicious as they are, there are many ways to switch things up! You can experiment with different fillings and glazes to create your own unique version. Let’s explore some fun variations that will make your Mini King Cakes even more exciting!
Different Fillings for Mini King Cakes
One of the best parts about baking is getting creative with flavors. Here are some tasty filling ideas to try:
- Chocolate Hazelnut: Swap the cinnamon filling for chocolate hazelnut spread. This rich filling will add a delightful twist.
- Fruit and Cream Cheese: Mix cream cheese with your favorite fruit preserves, like raspberry or strawberry. This filling adds a creamy texture and fruity flavor.
- Apple Cinnamon: Dice fresh apples and mix them with cinnamon and sugar. This filling gives a fresh and fruity taste to your cakes.
- Peanut Butter and Jelly: Spread peanut butter and your favorite jelly for a nostalgic twist. This combination is sure to please kids and adults alike!
Feel free to mix and match these fillings to find your favorite combination. The possibilities are endless!
Alternative Glazes and Toppings
Just like the fillings, you can also get creative with the glaze and toppings. Here are some ideas to consider:
- Cream Cheese Glaze: Replace the powdered sugar glaze with a cream cheese glaze. Mix cream cheese, powdered sugar, and a splash of milk for a tangy twist.
- Maple Glaze: Use maple syrup instead of milk in your glaze for a sweet, rich flavor. This pairs wonderfully with nutty fillings.
- Chocolate Drizzle: Melt some chocolate and drizzle it over the top for a decadent touch. This is perfect for chocolate lovers!
- Chopped Nuts: Sprinkle chopped nuts, like pecans or walnuts, on top of the glaze for added crunch and flavor.
These alternative glazes and toppings can elevate your Mini King Cakes, making them even more delightful. Don’t hesitate to experiment and find the perfect combination that suits your taste!
Cooking Note for Mini King Cakes Recipe
When making Mini King Cakes, a few cooking notes can help ensure your baking experience is smooth and successful. Here are some tips to keep in mind:
- Yeast Activation: Always check the expiration date on your yeast packet. Fresh yeast is crucial for a good rise. If your yeast doesn’t foam after mixing with warm milk, it may be inactive.
- Temperature Matters: Make sure your milk is warm, but not hot. If it’s too hot, it can kill the yeast. Aim for a temperature around 110°F (43°C).
- Kneading Technique: Knead the dough until it’s smooth and elastic. This helps develop gluten, giving your cakes a nice texture. If the dough is too sticky, sprinkle a little more flour as you knead.
- Rising Time: The rising times can vary based on your kitchen temperature. If it’s cooler, the dough may take longer to rise. Be patient and let it double in size for the best results.
- Cooling Before Glazing: Allow the mini king cakes to cool slightly before glazing. If they are too hot, the glaze may melt away, losing its beautiful finish.
- Storage Tips: Store any leftover Mini King Cakes in an airtight container at room temperature. They are best enjoyed fresh but can last for a few days.
By following these cooking notes, you’ll be well on your way to creating perfect Mini King Cakes every time. Enjoy the process and the delicious results!
Serving Suggestions for Mini King Cakes Recipe
Mini King Cakes are not just a treat; they are a delightful centerpiece for any gathering! Whether you’re celebrating Mardi Gras, a birthday, or just a fun get-together, these sweet pastries can be served in various ways to enhance your celebration. Here are some serving suggestions to make your Mini King Cakes even more enjoyable:
Festive Platter
Arrange your Mini King Cakes on a colorful platter. Use vibrant decorations like confetti or themed napkins to create a festive atmosphere. This presentation will surely catch the eye of your guests and set the mood for celebration!
Pair with Beverages
Consider serving your Mini King Cakes with a selection of beverages. Here are some great pairings:
- Coffee: A warm cup of coffee complements the sweetness of the cakes perfectly.
- Hot Chocolate: For a cozy touch, serve with rich hot chocolate, especially during colder months.
- Fruit Juices: Fresh fruit juices, like orange or apple, add a refreshing contrast to the sweet flavors.
Mini King Cake Bar
Set up a Mini King Cake bar where guests can customize their treats! Provide various toppings and fillings, such as:
- Extra colored sugar sprinkles
- Chopped nuts
- Whipped cream
- Fruit preserves
This interactive experience allows everyone to create their own unique Mini King Cake, making it a fun activity for all ages!
Gift Boxes
Mini King Cakes also make wonderful gifts! Package them in decorative boxes or bags to share with friends and family. This thoughtful gesture is perfect for holidays or special occasions, spreading joy and sweetness beyond your gathering.
Accompanying Desserts
For a dessert spread, consider pairing Mini King Cakes with other sweet treats. Here are some ideas:
- Cookies: Offer a variety of cookies, such as chocolate chip or sugar cookies, for a delightful mix.
- Cupcakes: Mini cupcakes in festive colors can complement the theme and add variety.
- Fruit Salad: A fresh fruit salad can balance the sweetness of the cakes and provide a refreshing option.
With these serving suggestions, your Mini King Cakes will not only taste amazing but also create a memorable experience for your guests. Enjoy the celebration and the delicious treats!
Tips for Perfecting Your Mini King Cakes Recipe
Creating the perfect Mini King Cakes is an art that combines technique, patience, and a little creativity. To help you achieve the best results, here are some valuable tips to keep in mind while baking:
Use Fresh Ingredients
Always use fresh ingredients, especially yeast. Check the expiration date on your yeast packet. Fresh yeast is essential for a good rise. If your yeast doesn’t foam after mixing with warm milk, it may be inactive, and you’ll need to start over.
Measure Accurately
Accurate measurements are crucial in baking. Use measuring cups and spoons for dry and wet ingredients. Too much flour can make your dough dense, while too little can lead to a sticky mess. Invest in a kitchen scale for precise measurements if possible.
Temperature Matters
Ensure your milk is warm but not hot. The ideal temperature is around 110°F (43°C). If it’s too hot, it can kill the yeast, preventing your dough from rising. Use a thermometer for accuracy.
Knead Properly
Kneading develops gluten, which gives your cakes a nice texture. Knead the dough until it’s smooth and elastic, about 5-7 minutes. If the dough is too sticky, sprinkle a little more flour as you knead. Don’t over-knead, as this can make the dough tough.
Be Patient with Rising
Rising times can vary based on your kitchen temperature. If it’s cooler, the dough may take longer to rise. Be patient and let it double in size for the best results. A warm, draft-free area is ideal for rising.
Cool Before Glazing
Allow the mini king cakes to cool slightly before glazing. If they are too hot, the glaze may melt away, losing its beautiful finish. A little patience here will pay off in presentation!
Experiment with Flavors
Don’t hesitate to experiment with different fillings and glazes. Try adding spices like nutmeg or cardamom to the dough for extra flavor. You can also mix in chocolate chips or dried fruits for a unique twist. The more you experiment, the more you’ll discover your favorite combinations!
Store Properly
Store any leftover Mini King Cakes in an airtight container at room temperature. They are best enjoyed fresh but can last for a few days. If you want to keep them longer, consider freezing them. Just make sure to wrap them tightly to prevent freezer burn.
By following these tips, you’ll be well on your way to perfecting your Mini King Cakes. Enjoy the baking process and the delicious results!
Breakdown of Time for Mini King Cakes Recipe
Understanding the time required for each step in the Mini King Cakes recipe can help you plan your baking session better. Here’s a detailed breakdown of the time you’ll need to create these delightful treats:
Prep Time
The prep time for Mini King Cakes is approximately 20 minutes. This includes gathering your ingredients, mixing the dough, and preparing the filling. It’s a quick and enjoyable process that sets the stage for the delicious baking ahead!
Cooking Time
Once your dough has risen, the cooking time is about 20 minutes. This includes the baking time in the oven, where the mini king cakes transform into golden, fluffy delights. Keep an eye on them to ensure they don’t overbake!
Total Time
In total, you’ll need around 2 hours and 10 minutes to make Mini King Cakes. This includes the prep time, the first rise of the dough (1 hour), the second rise after shaping (30 minutes), and the baking time. While it may seem like a lengthy process, most of this time is hands-off, allowing you to relax while the dough rises and bakes.
With this time breakdown, you can easily plan your baking session and enjoy the delightful process of making Mini King Cakes. Happy baking!
Nutritional Information for Mini King Cakes Recipe
Understanding the nutritional content of your Mini King Cakes can help you enjoy them in moderation. While these delightful treats are perfect for celebrations, it’s good to know what you’re indulging in. Here’s a breakdown of the nutritional information for one Mini King Cake, based on the ingredients listed in the recipe.
Calories
Each Mini King Cake contains approximately 180 calories. This number can vary slightly based on the specific ingredients used, especially if you choose to add optional fillings like pecans or raisins. While they are a sweet treat, enjoying them in moderation is key to maintaining a balanced diet.
Protein
In terms of protein, each Mini King Cake offers about 3 grams. The protein mainly comes from the egg and the milk used in the dough. While this isn’t a high-protein snack, it does contribute to your daily intake, especially when paired with other protein-rich foods during your meal.
Sodium
Each Mini King Cake contains roughly 150 milligrams of sodium. This amount is relatively low, making them a suitable option for those watching their sodium intake. However, if you are sensitive to sodium, be mindful of the other foods you consume alongside these treats.
By keeping these nutritional facts in mind, you can enjoy your Mini King Cakes while being aware of their contribution to your overall diet. Remember, balance is essential, and these sweet pastries can be a delightful part of your celebrations!
FAQs about Mini King Cakes Recipe
What is the origin of King Cakes?
King Cakes have a rich history that dates back to ancient times. They originated in France, where they were made to celebrate the Epiphany, marking the arrival of the Three Wise Men. Traditionally, a small figurine or bean is hidden inside the cake, and the person who finds it is crowned king or queen for the day. This fun tradition has spread to various cultures, especially in New Orleans, where King Cakes are a staple during Mardi Gras celebrations. The vibrant colors and festive spirit of King Cakes make them a beloved treat for many!
Can I make Mini King Cakes ahead of time?
Yes, you can prepare Mini King Cakes ahead of time! You can make the dough and filling a day in advance. After shaping the cakes, place them in the muffin tin and cover them with plastic wrap. Refrigerate overnight. The next day, allow them to come to room temperature and rise for about 30 minutes before baking. This method saves time and allows you to enjoy fresh Mini King Cakes without the last-minute rush!
How do I store leftover Mini King Cakes?
To store leftover Mini King Cakes, place them in an airtight container at room temperature. They are best enjoyed fresh but can last for up to three days. If you want to keep them longer, consider freezing them. Wrap each Mini King Cake tightly in plastic wrap and then place them in a freezer-safe bag. They can be frozen for up to three months. When you’re ready to enjoy them, simply thaw at room temperature or warm them in the oven for a few minutes!
What can I use instead of traditional fillings?
If you want to get creative, there are plenty of alternatives to traditional fillings! Here are some ideas:
- Nut Butters: Use almond or cashew butter for a nutty flavor.
- Fruit Preserves: Swap the filling for your favorite fruit preserves, like apricot or blueberry.
- Chocolate Chips: Add chocolate chips for a sweet, melty surprise.
- Spiced Apples: Cook diced apples with cinnamon and sugar for a warm, fruity filling.
Feel free to mix and match these options to create your own unique Mini King Cakes that suit your taste!
Conclusion on Mini King Cakes Recipe
In conclusion, Mini King Cakes are a delightful and festive treat that can brighten any celebration. With their soft, sweet dough and flavorful filling, they are sure to be a hit among family and friends. Whether you’re celebrating Mardi Gras, a birthday, or simply enjoying a cozy gathering, these mini cakes bring joy and sweetness to the table.
By following the steps outlined in this recipe, you can create your own batch of Mini King Cakes that not only taste amazing but also look beautiful with their colorful glaze and sprinkles. Remember, the beauty of baking lies in creativity. Feel free to experiment with different fillings and toppings to make these treats your own.
As you bake, keep in mind the tips and variations shared throughout this article. They will help you perfect your Mini King Cakes and make the baking process enjoyable. Don’t forget to share your creations with loved ones, as the joy of these treats is best experienced together.
So, gather your ingredients, roll up your sleeves, and embark on this delightful baking adventure. Your Mini King Cakes await, ready to bring smiles and sweetness to your celebrations. Happy baking!

Mini King Cakes
Ingredients
Equipment
Method
-
In a large mixing bowl, combine flour, sugar, and salt.
-
In a separate bowl, mix warm milk with active dry yeast and let sit for 5 minutes until frothy.
-
Add melted butter, egg, and vanilla extract to the yeast mixture and stir to combine.
-
Pour the yeast mixture into the dry ingredients and mix until a dough forms.
-
Knead the dough on a floured surface for 5-7 minutes until smooth and elastic.
-
Place the dough in a greased bowl, cover with a cloth, and let rise in a warm place for 1 hour or until doubled in size.
-
While the dough is rising, prepare the filling by mixing brown sugar, cinnamon, and softened butter in a small bowl. Add pecans and raisins if desired.
-
Once the dough has risen, punch it down and roll it out into a rectangle about 1/4 inch thick.
-
Spread the filling mixture evenly over the dough, then roll it tightly from one long side to the other to form a log.
-
Cut the log into 1-inch thick pieces and place them cut-side up in a greased muffin tin.
-
Cover the muffin tin with a cloth and let the mini king cakes rise for another 30 minutes.
-
Preheat the oven to 350°F (175°C). Bake the mini king cakes for 15-20 minutes or until golden brown.
-
While the cakes are cooling, prepare the glaze by whisking together powdered sugar, milk, and vanilla extract until smooth.
-
Drizzle the glaze over the warm mini king cakes and sprinkle with colored sugar sprinkles.