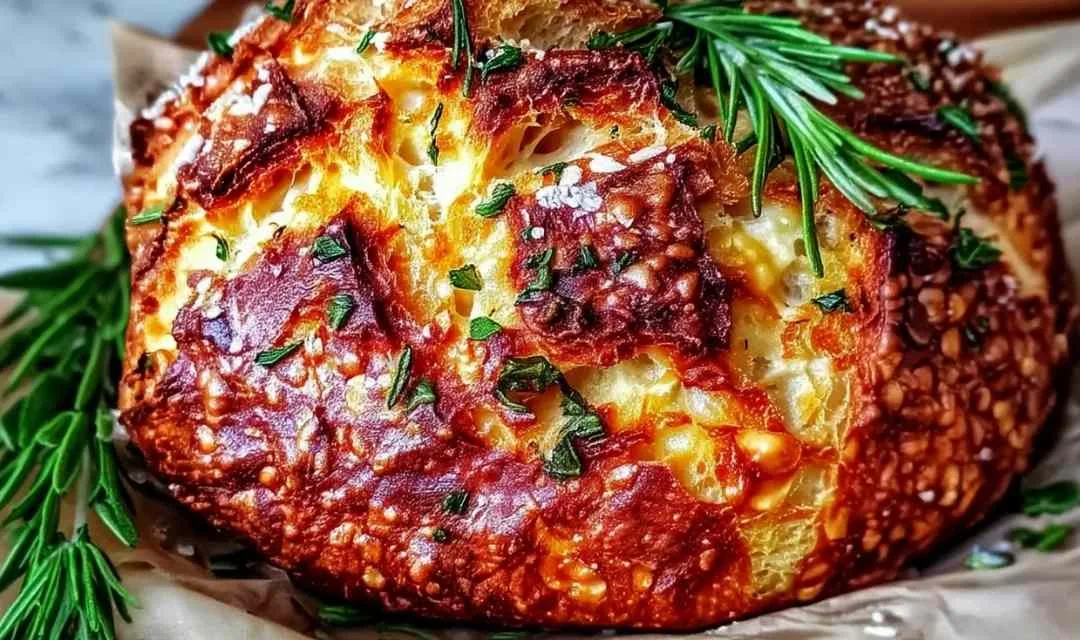
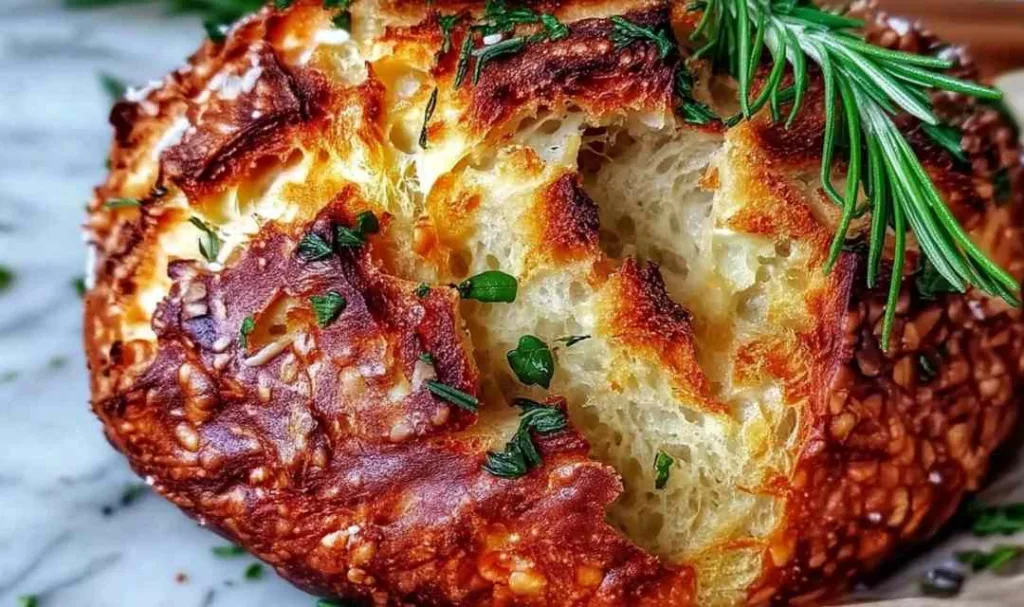
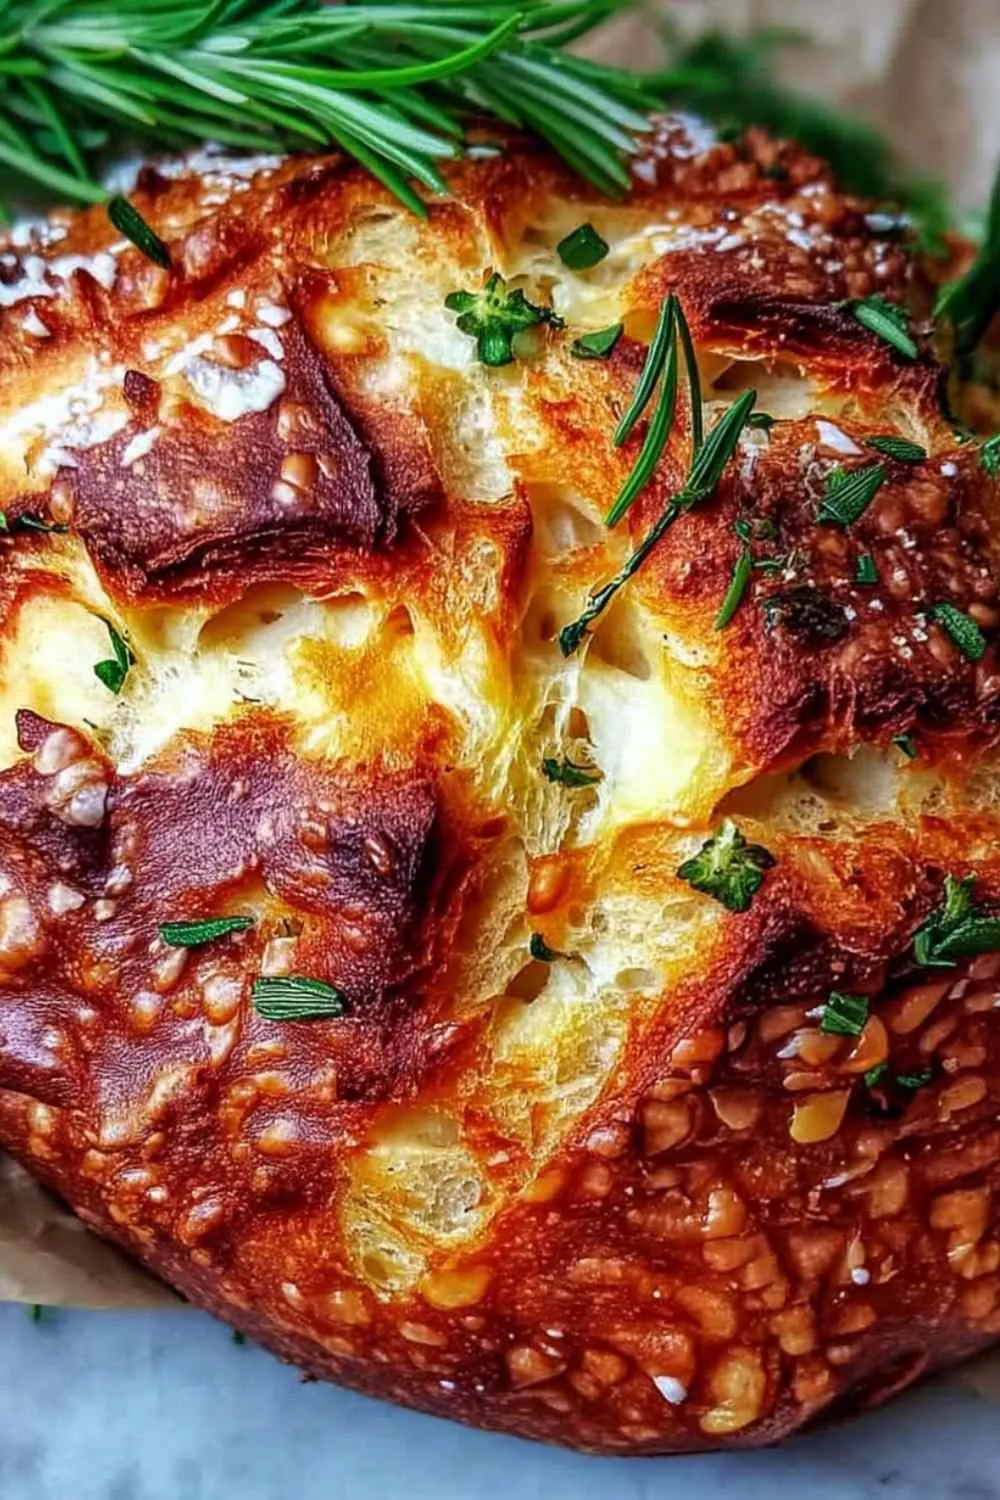
Perfect parmesan garlic bread transforms any ordinary meal into something special, and you don’t need fancy skills to make it happen. I’ve been baking this bread in my kitchen for years, and it never fails to fill the house with that irresistible aroma of toasted cheese and roasted garlic.
There’s something magical about pulling a golden loaf from the oven, hearing that satisfying hollow tap when you test it, and watching your family’s faces light up at the dinner table. This recipe reminds me of Sunday afternoons at Grandma’s farm, where fresh bread was always cooling on the counter, ready to soak up the last drops of her vegetable soup. She taught me that good bread doesn’t require complicated techniques, just patience, simple ingredients, and a little bit of love. The combination of sharp parmesan and fragrant garlic creates that perfect balance between savory richness and aromatic warmth. Your kitchen’s about to smell incredible.
What Makes This Parmesan Garlic Bread So Special
This isn’t just another bread recipe. It’s the kind of perfect parmesan garlic bread that makes people ask for seconds before they’ve finished their first slice. I developed this method after years of testing different approaches, and I can confidently say it delivers bakery results without the bakery hassle.
What you’ll discover when you make this recipe:
- Simple pantry ingredients you probably already have in your cupboard
- No-knead method that works around your schedule, not against it
- Crispy golden crust with a pillowy soft interior that rivals any artisan bakery
- Make-ahead friendly so you can prep the dough overnight and bake fresh when needed
- Freezer-ready for those busy weeks when you need homemade bread in minutes
- Impressive presentation that looks like you spent hours perfecting your craft
In my kitchen, this bread has become the answer to “what should I bring?” at family gatherings. It pairs beautifully with everything from hearty stews to light summer salads, and there’s never a crumb left on the plate.
Ingredient Spotlight
All-purpose flour forms the foundation of your perfect parmesan garlic bread, creating that ideal structure for both the crispy crust and tender crumb. I always use unbleached flour when I can find it, as it gives a slightly better flavor and color.
Active dry yeast is what creates those beautiful air pockets and gives the bread its lift. Make sure your yeast is fresh. I learned the hard way that expired yeast means flat, dense bread no matter how carefully you follow the steps.
Warm water at around 110°F activates the yeast without killing it. I test mine with my fingertip. It should feel like a warm bath, comfortable but not hot.
Freshly grated parmesan cheese melts into the dough and creates those golden, crispy bits on the crust. In my kitchen, I prefer grating my own from a block rather than using pre-grated. The flavor difference is remarkable and totally worth the extra minute.
Fresh garlic delivers that unmistakable aromatic punch that makes this bread so addictive. I mince mine finely so it distributes evenly throughout the dough without creating overpowering pockets.
Olive oil adds richness and helps create that tender interior texture. Betty always chose extra virgin for its fuller flavor, though any good olive oil works beautifully.
Salt enhances all the other flavors and strengthens the gluten structure. Don’t skip it. Bread without enough salt tastes flat no matter how perfect your technique.
Sugar feeds the yeast and helps with browning, though it’s such a small amount you won’t taste sweetness in the finished bread.
How to Make Perfect Parmesan Garlic Bread
Step 1. I always start by whisking together the flour, salt, and sugar in my largest mixing bowl, making sure everything is evenly distributed before the wet ingredients join the party.
Step 2. Betty taught me to bloom the yeast first. Dissolve it in the warm water and wait about 5 minutes until you see those telltale bubbles forming on top, confirming your yeast is alive and ready to work.
Step 3. After years of making this, I’ve learned that when you pour the yeast mixture into the flour, you want to mix just until everything comes together in a shaggy, sticky mass. This isn’t the time for smooth dough.
Step 4. Fold in the parmesan cheese and minced garlic gently, being careful not to overmix. The dough should look rough and sticky, which might feel wrong but creates that perfect open crumb structure.
Step 5. I cover the bowl with a clean kitchen towel and tuck it away in a warm spot for 12-18 hours. This long, slow rise develops incredible flavor and creates those gorgeous air pockets in your perfect parmesan garlic bread. The dough should roughly double in size and look bubbly across the top.
Step 6. When the dough has doubled and looks bubbly on top, turn it out onto a well-floured surface and shape it gently into a round, resisting the urge to knead or overwork it.
Step 7. Betty’s tip: Let the shaped dough rest on parchment paper for 30 minutes while your oven and Dutch oven (5-6 quart size works best) preheat to 450°F. This final rest gives the bread its beautiful rise.
Step 8. Score the top with a sharp knife in a crosshatch or simple slash pattern about 1/4 to 1/2 inch deep. I’ve found that confident, quick cuts work better than hesitant sawing motions.
Step 9. The key I discovered is carefully lowering the parchment paper with the dough into the screaming hot Dutch oven, covering with the lid, and baking for 30 minutes to trap all that steam for a crispy crust.
Step 10. Remove the lid and bake another 15 minutes until the bread is deeply golden brown and sounds hollow when you tap the bottom. This is when all that parmesan caramelizes into crispy, flavorful bits.
Keeping This Parmesan Garlic Bread Fresh
I typically store leftover parmesan garlic bread in a paper bag or bread box at room temperature for up to 3 days. Plastic bags make the crust soft and chewy instead of crispy, which is why I avoid them. The bread actually develops even better flavor on the second day as the garlic and parmesan continue to meld together.
For longer storage, this bread freezes beautifully. I slice it first, then wrap the whole loaf tightly in aluminum foil followed by a freezer bag. Betty’s freezing method works well because you can pull out just a few slices at a time without thawing the entire loaf. Properly wrapped, your perfect parmesan garlic bread stays fresh in the freezer for up to 3 months.
For the best texture, I reheat by wrapping frozen slices in foil and warming them in a 350°F oven for about 10 minutes, or 15 minutes if reheating the whole loaf. The oven brings back that crispy crust while keeping the interior soft. Microwaving makes it rubbery, so I only use that method when I’m desperate and willing to accept a softer texture.

Perfect Partners for Parmesan Garlic Bread
This bread shines alongside so many dishes from my recipe collection:
- Hearty chicken pot pie soup lets you dunk crusty bread into creamy, savory broth for the ultimate comfort meal on chilly evenings.
- Creamy tomato beef pasta pairs beautifully with garlic bread that mops up every bit of that rich, tomatoey sauce.
- Classic Caesar salad or mixed greens with balsamic vinaigrette gets a textural boost from crispy, savory bread that cuts through tangy dressing.
- Cowboy butter steak bites served with this bread creates an indulgent meal where the bread soaks up that incredible garlic butter sauce.
- Easy lasagna soup becomes even more satisfying when you have crusty garlic bread for dipping and soaking up the Italian flavors.
- Creamy garlic chicken makes for an impressive dinner where the bread complements the rich, garlicky sauce perfectly.
- Olive oil and balsamic vinegar for dipping lets the parmesan and garlic flavors truly shine in the simplest, most elegant way.
- Marry me chicken soup with its sun-dried tomatoes and creamy broth is absolutely made for dunking slices of this garlic bread.
My family’s favorite way to serve this is cutting thick slices, toasting them lightly, and piling them in a basket at the center of the table where everyone can reach. The bread disappears faster than you’d think possible.
FAQs
I recommend using instant yeast in the same amount. You can even skip the blooming step and mix it directly with the dry ingredients, though I still prefer blooming it for peace of mind.
This is exactly what you want. Many home cooks find success with this wetter dough because it creates those beautiful air pockets and tender crumb. Resist adding extra flour, which makes the bread dense.
Betty’s solution is baking the bread on a preheated pizza stone or baking sheet with a metal bowl inverted over it for the first 30 minutes to trap steam, though the Dutch oven gives more reliable results.
High Protein BBQ Ranch Chicken Bowl
Ingredients
Equipment
Method
- Combine olive oil, garlic powder, smoked paprika, salt, and pepper in a small bowl. Rub evenly over chicken breasts pounded to 1 inch thickness and marinate for 10 minutes at room temperature.
- Heat a grill pan or skillet over medium high heat until water sizzles on contact. Cook chicken 6 to 7 minutes per side until internal temperature reaches 165 degrees F. Rest for 5 minutes then slice into strips.
- Cook brown rice or quinoa as directed if not using pre cooked. Prep veggies: halve cherry tomatoes, dice onion, shred lettuce, rinse beans, and warm corn if frozen (microwave 1 minute on high power).
- In each bowl add cooked grains as base. Arrange corn, beans, tomatoes, onion, greens, and sliced chicken on top in sections.
- Mix ranch dressing and BBQ sauce in a small bowl. Drizzle over each bowl, sprinkle with cheese, and garnish with cilantro or green onions if desired. Serve warm or chilled.