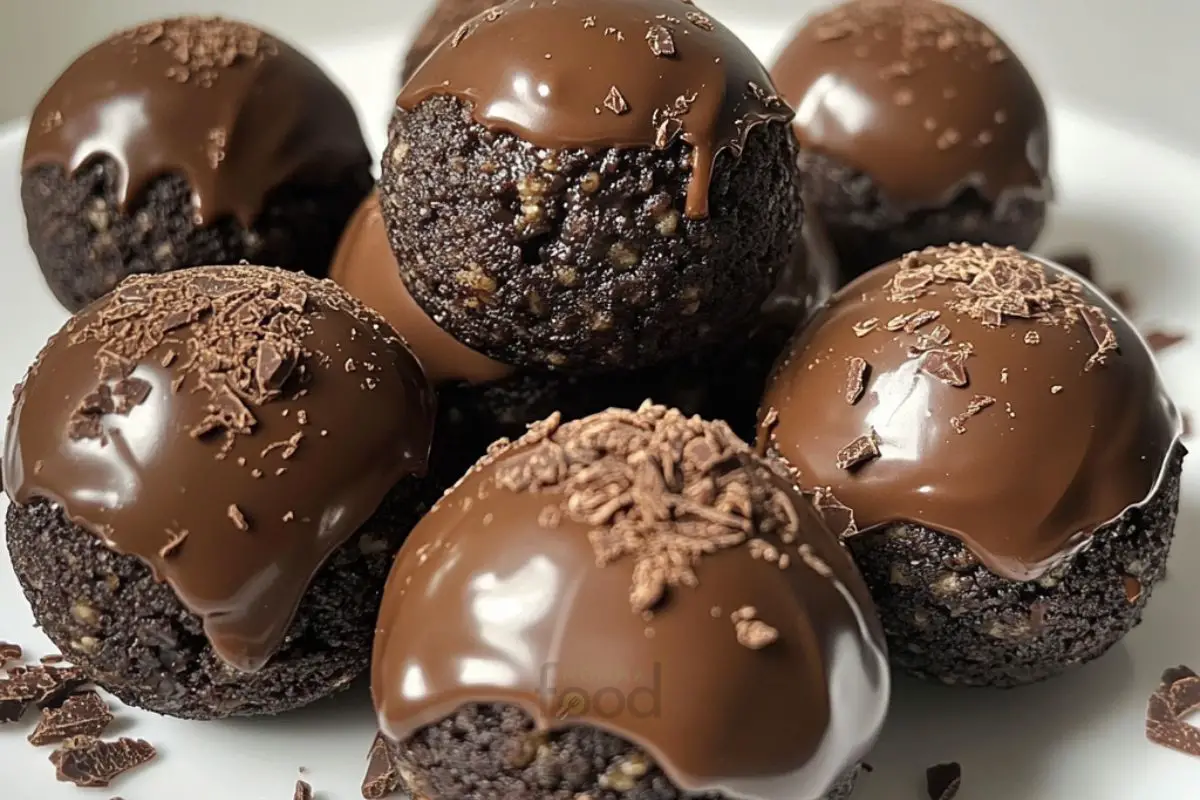
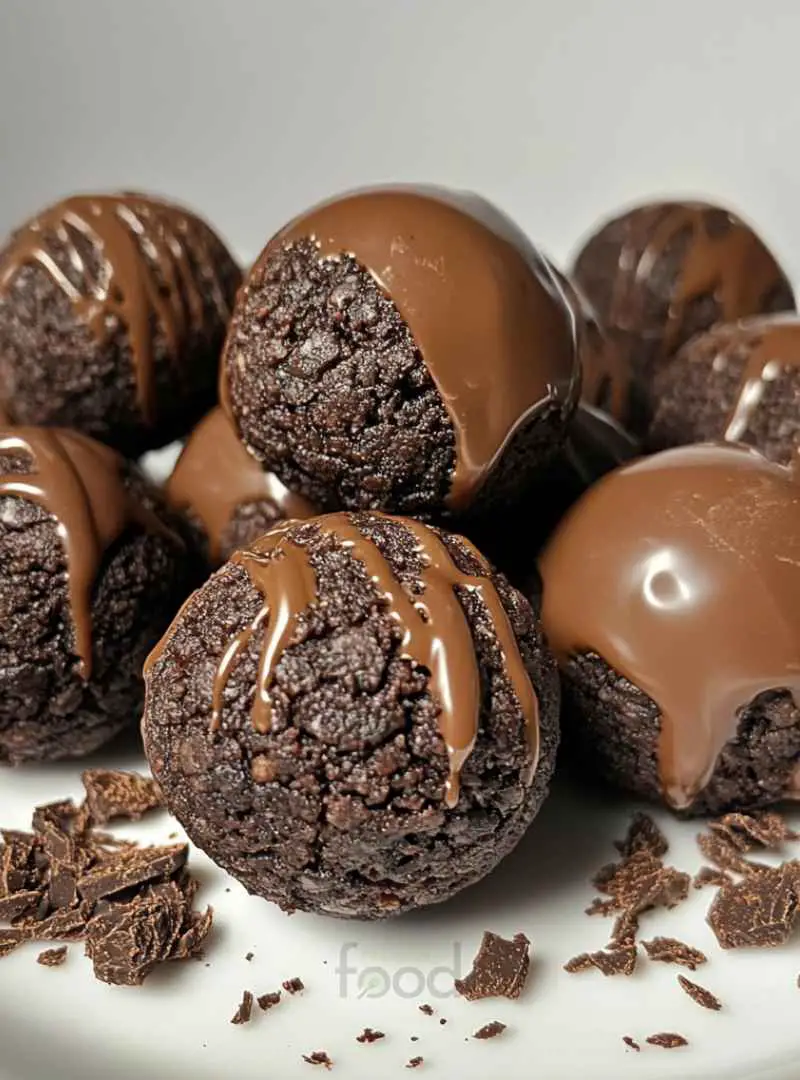
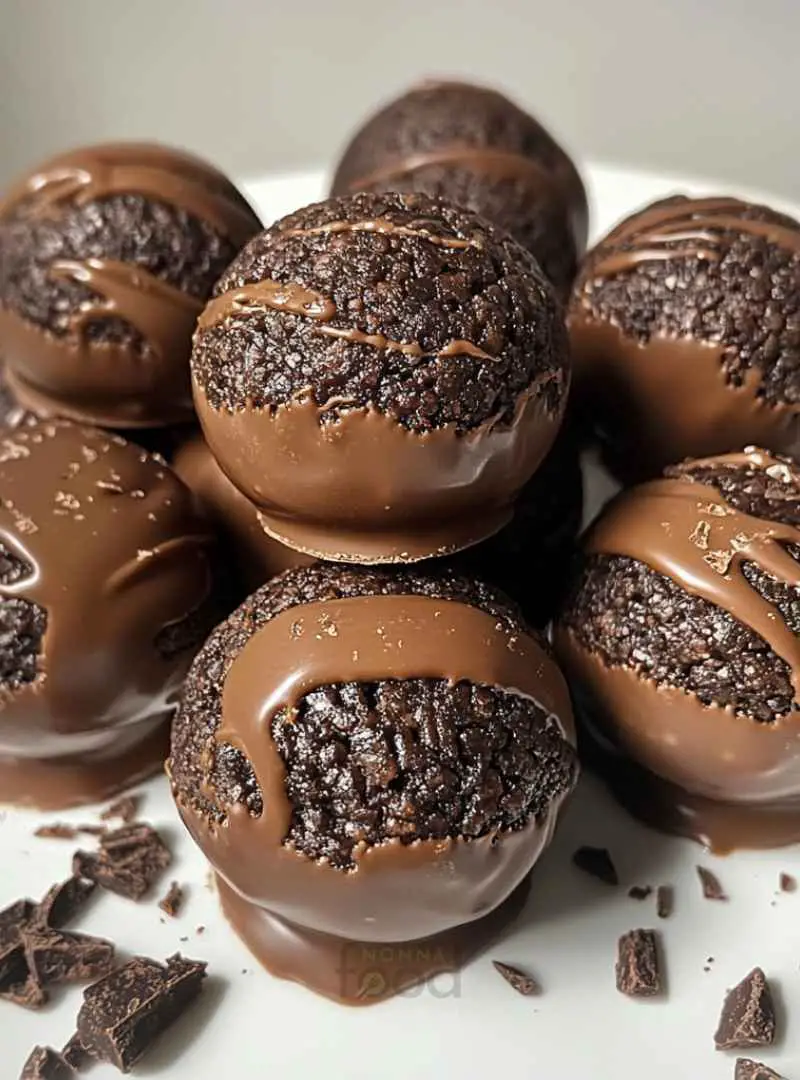
Oreo Balls
Oreo balls are a delightful treat that combines the rich flavor of Oreo cookies with creamy cream cheese and a luscious chocolate coating. These bite-sized desserts are not only easy to make but also incredibly satisfying. Whether you’re hosting a party, celebrating a special occasion, or simply craving something sweet, Oreo balls are sure to impress your guests and satisfy your sweet tooth.
What Are Oreo Balls?
Oreo balls are no-bake desserts made from crushed Oreo cookies mixed with softened cream cheese. This mixture is rolled into small balls and then coated in melted chocolate. The result is a rich, creamy, and crunchy treat that melts in your mouth. They are often served chilled, making them a refreshing dessert option. With their simple ingredients and straightforward preparation, Oreo balls are a favorite among both novice and experienced bakers.
Why Oreo Balls Are Perfect for Any Occasion
One of the best things about Oreo balls is their versatility. They can be made for any occasion, from birthday parties to holiday gatherings. Their appealing appearance and delicious taste make them a hit with both kids and adults. Plus, they are easy to customize! You can experiment with different flavors, coatings, and toppings to suit your event. Whether you’re celebrating a milestone or just want a sweet snack, Oreo balls are the perfect choice. They are quick to prepare and can be made ahead of time, allowing you to enjoy your event without stress.
Ingredients for Oreo Balls
To create the perfect balls, you need a few essential ingredients. These ingredients come together to form a delicious treat that everyone will love. Let’s take a closer look at what you’ll need to make these delightful snacks.
Essential Ingredients for Making Oreo Balls
- Oreo Cookies: The star of the show! You’ll need one package (15.35 oz) of Oreo cookies. Their rich chocolate flavor is what makes these balls so irresistible.
- Cream Cheese: One package (8 oz) of softened cream cheese is essential. It adds creaminess and binds the crushed Oreos together, creating a dough-like consistency.
- Chocolate Chips: You’ll need 2 cups of chocolate chips, either semi-sweet or milk chocolate. This will be used to coat the balls, giving them a sweet and smooth finish.
- Vegetable Oil: This is optional, but adding 1 tablespoon of vegetable oil can help thin the chocolate for easier melting and dipping.
Optional Ingredients to Enhance Your Oreo Balls
While the essential ingredients are all you need for classic Oreo balls, you can also add some optional ingredients to elevate your treat:
- Flavor Extracts: Consider adding a splash of vanilla or mint extract to the cream cheese mixture for an extra layer of flavor.
- Sprinkles: After coating the balls in chocolate, sprinkle some colorful sprinkles on top for a festive touch.
- Crushed Nuts: For a crunchy texture, you can roll the balls in crushed nuts like almonds or walnuts before chilling.
- Different Cookie Varieties: Try using different flavored cookies, like peanut butter or mint Oreos, to create unique variations of Oreo balls.
With these ingredients, you’re well on your way to making delicious Oreo balls that will delight everyone. The combination of flavors and textures makes them a must-try treat!
Step-by-Step Preparation of Oreo Balls
Now that you have your ingredients ready, it’s time to dive into the fun part: making your balls! This step-by-step guide will walk you through the process, ensuring you create delicious treats that everyone will love.
Step 1: Prepare Oreo Mixture
Crushing the Oreos
Start by crushing the Oreo cookies. You can use a food processor for a quick and easy method. Just pulse the cookies until they turn into fine crumbs. If you don’t have a food processor, no worries! Place the cookies in a zip-top bag and crush them with a rolling pin. This method is just as effective and can be a fun way to release some energy!
Mixing with Cream Cheese
Next, take the crushed Oreos and transfer them to a large mixing bowl. Add the softened cream cheese to the bowl. Using a spatula or your hands, mix the two ingredients together until they are well combined. You want to achieve a dough-like consistency that holds together well. This mixture is the base of your balls, so make sure it’s mixed thoroughly!
Step 2: Form Balls
Shaping the Mixture
Once your Oreo mixture is ready, it’s time to shape it into balls. Scoop out about a tablespoon of the mixture and roll it into a ball using your hands. Aim for a uniform size so that they all cook evenly. Place each ball on a baking sheet lined with parchment paper. This will prevent them from sticking and make cleanup easier.
Chilling the Balls
After shaping all the balls, it’s important to chill them. Place the baking sheet in the refrigerator for about 30 minutes. This step helps the balls firm up, making them easier to coat with chocolate later. Plus, it enhances the flavor as the ingredients meld together!
Step 3: Coat with Chocolate
Melting the Chocolate
While the balls chill, it’s time to melt the chocolate. In a microwave-safe bowl, add the chocolate chips. Heat them in the microwave in 30-second intervals, stirring in between. This method prevents the chocolate from burning. If you want a smoother coating, you can add a tablespoon of vegetable oil to the chocolate as it melts.
Dipping Oreo Balls
Once the chocolate is melted and smooth, take the chilled balls out of the refrigerator. Using a fork or a toothpick, dip each ball into the melted chocolate. Make sure to coat them completely. Allow any excess chocolate to drip off before placing the balls back on the parchment-lined baking sheet. This step is crucial for achieving that perfect chocolate coating!
Step 4: Chill and Serve
Setting the Coating
After all the balls are coated in chocolate, return the baking sheet to the refrigerator. Let them chill for another 15-20 minutes. This will help the chocolate set and create a deliciously firm outer layer. You can also sprinkle some toppings on the chocolate before it sets for added flair!
Serving Suggestions
Once the chocolate has hardened, your Oreo balls are ready to serve! You can arrange them on a decorative plate for a beautiful presentation. They make a fantastic dessert for parties, gatherings, or even as a sweet snack at home. Enjoy your delicious Oreo balls and watch them disappear in no time!
Variations of Oreo Balls
Oreo balls are already a delightful treat, but why stop there? You can easily customize them to suit your taste or the occasion. Here are some fun variations and creative ideas to make your Oreo balls even more exciting!
Different Flavors to Try
While classic Oreo balls are delicious, experimenting with different flavors can take them to the next level. Here are some ideas:
- Peanut Butter Balls: Mix in some creamy peanut butter with the cream cheese for a nutty twist. This combination is perfect for peanut butter lovers!
- Mint Oreo Balls: Use mint-flavored Oreo cookies instead of regular ones. This will give your balls a refreshing minty flavor that’s perfect for the holidays.
- Chocolate Mint Oreo Balls: Combine mint Oreos with a splash of peppermint extract in the cream cheese mixture. Coat them in dark chocolate for a rich, minty treat.
- Red Velvet Oreo Balls: Swap out regular Oreos for red velvet cookies. This variation is not only tasty but also visually stunning!
- Cookie Dough Oreo Balls: Add mini chocolate chips to the cream cheese mixture for a cookie dough-inspired treat. This adds a fun texture and extra sweetness!
Creative Coating Options for Oreo Balls
Coating your Oreo balls in chocolate is just the beginning. Here are some creative ideas to make your treats stand out:
- White Chocolate Coating: Instead of using semi-sweet or milk chocolate, try white chocolate for a sweeter, creamier flavor. You can also drizzle dark chocolate on top for a beautiful contrast.
- Colored Chocolate: Use colored candy melts to coat your balls. This is a fun way to match the treats to a theme or occasion, like birthdays or holidays.
- Crushed Candy Toppings: After dipping in chocolate, roll the balls in crushed candies like peppermint, toffee, or even sprinkles for added texture and flavor.
- Shredded Coconut: For a tropical twist, roll your chocolate-coated balls in shredded coconut. This adds a chewy texture and a hint of coconut flavor.
- Chopped Nuts: Roll the balls in chopped nuts like almonds or pecans for a crunchy finish. This adds a delightful contrast to the creamy center.
With these variations and creative coating options, you can make balls that are not only delicious but also visually appealing. Get creative and have fun experimenting with flavors and toppings!
Cooking Note for Oreo Balls
Making Oreo balls is a fun and rewarding experience. However, there are a few tips to keep in mind to ensure your treats turn out perfectly every time. Here are some helpful hints for achieving that ideal chocolate coating and overall deliciousness.
Tips for Perfectly Coated Oreo Balls
- Use Room Temperature Ingredients: Make sure your cream cheese is softened to room temperature. This helps it blend smoothly with the crushed Oreos, creating a uniform mixture.
- Chill Before Coating: Don’t skip the chilling step! Chilling the Oreo balls before dipping them in chocolate helps them hold their shape and makes them easier to coat.
- Work in Batches: If you’re making a large batch, consider working in smaller groups. This way, the chocolate stays warm and easy to work with, ensuring a smooth coating.
- Use a Fork for Dipping: A fork is a great tool for dipping. It allows you to easily coat the balls while letting excess chocolate drip off. This helps prevent a thick layer of chocolate that can overpower the flavor.
- Let Chocolate Set Properly: After coating, allow the balls to chill until the chocolate is fully set. This ensures a nice, firm coating that won’t melt away when you serve them.
- Experiment with Toppings: Don’t be afraid to get creative! Adding toppings like crushed cookies, sprinkles, or nuts can enhance both the flavor and appearance of your Oreo balls.
By following these tips, you’ll be well on your way to making perfectly coated Oreo balls that are sure to impress. Enjoy the process and the delicious results!
Serving Suggestions for Oreo Balls
Oreo balls are not just delicious; they are also incredibly versatile when it comes to serving. Whether you’re hosting a party or enjoying a quiet night at home, these treats can fit into any occasion. Here are some great suggestions for when and how to serve your Oreo balls.
Best Occasions to Serve Oreo Balls
- Birthday Parties: Oreo balls make a fantastic addition to any birthday celebration. Their fun appearance and delightful taste will surely be a hit with guests of all ages.
- Holiday Gatherings: Whether it’s Christmas, Halloween, or Easter, Oreo balls can be themed to match the occasion. Use colored chocolate or festive sprinkles to enhance the holiday spirit.
- Baby Showers: These treats are perfect for baby showers. You can customize them with pastel colors or even use cookie cutters to create fun shapes.
- Game Nights: Serve Oreo balls during game nights for a sweet snack that everyone can enjoy while having fun. They are easy to grab and eat, making them a great finger food.
- Movie Nights: Enjoying a movie at home? balls are the perfect treat to munch on while watching your favorite film. Pair them with popcorn for a delightful snack mix!
Pairing Oreo Balls with Other Treats
Oreo balls can be enjoyed on their own, but they also pair wonderfully with other treats. Here are some ideas to create a delightful dessert spread:
- Brownies: Serve Oreo balls alongside fudgy brownies for a rich dessert experience. The combination of textures and flavors will please any sweet tooth.
- Ice Cream: Pair Oreo balls with a scoop of vanilla or chocolate ice cream. The cold ice cream complements the rich chocolate coating of the Oreo balls perfectly.
- Fruit Platters: Balance the sweetness of Oreo balls with fresh fruit. Strawberries, raspberries, or sliced apples can provide a refreshing contrast.
- Coffee or Hot Chocolate: Enjoy Oreo balls with a warm beverage. The sweetness of the treats pairs beautifully with the rich flavors of coffee or hot chocolate.
- Cheesecake Bites: Create a dessert platter with mini cheesecake bites and Oreo balls. This combination offers a variety of flavors and textures that guests will love.
With these serving suggestions, you can elevate your Oreo balls from a simple treat to a star attraction at any gathering. Enjoy the smiles and compliments as everyone indulges in these delightful bites!
Tips for Making the Best Oreo Balls
Creating the perfect Oreo balls is a delightful experience, but there are a few common pitfalls to watch out for. By avoiding these mistakes, you can ensure that your treats turn out delicious every time. Here are some tips to help you make the best Oreo balls possible.
Common Mistakes to Avoid
- Not Softening the Cream Cheese: One of the biggest mistakes is using cold cream cheese. Always make sure it’s softened to room temperature. This helps it blend smoothly with the crushed Oreos, creating a cohesive mixture.
- Overmixing the Dough: While it’s important to mix the ingredients well, overmixing can lead to a tough texture. Mix just until combined for the best results.
- Skipping the Chilling Step: Chilling the Oreo balls before coating them in chocolate is crucial. Skipping this step can result in balls that lose their shape during dipping.
- Using Too Much Chocolate: While chocolate is delicious, using too much can overpower the flavor of the Oreo balls. Aim for a thin, even coating to let the Oreo flavor shine through.
- Not Allowing Chocolate to Set: After coating, it’s tempting to dig in right away. However, letting the chocolate set properly in the fridge ensures a firm and enjoyable treat.
Storage Tips for Oreo Balls
Once you’ve made your delicious Oreo balls, you’ll want to store them properly to maintain their freshness. Here are some helpful storage tips:
- Refrigeration: Store your Oreo balls in an airtight container in the refrigerator. They can last for up to a week, making them a great make-ahead treat.
- Freezing: If you want to keep them longer, Oreo balls freeze well. Place them in a single layer on a baking sheet to freeze, then transfer to a freezer-safe container. They can last for up to three months in the freezer.
- Thawing: When you’re ready to enjoy your frozen Oreo balls, simply transfer them to the fridge for a few hours to thaw. Avoid microwaving them, as this can cause the chocolate to melt unevenly.
- Labeling: If you’re freezing multiple batches, label your containers with the date and flavor. This way, you’ll know exactly what you have on hand!
By following these tips, you’ll be well on your way to making and storing the best Oreo balls. Enjoy the process and the delicious results!
Breakdown of Time for Oreo Balls
When making Oreo balls, it’s helpful to know how much time each step will take. This way, you can plan your baking session efficiently. Here’s a breakdown of the time involved in preparing these delightful treats.
Prep Time
The prep time for Oreo balls is quite short. You’ll spend about 20 minutes gathering your ingredients and preparing the Oreo mixture. This includes crushing the Oreos and mixing them with cream cheese. It’s a quick and easy process that anyone can manage!
Chill Time
Chill time is essential for achieving the perfect texture. After forming the balls, you’ll need to chill them in the refrigerator for about 30 minutes. This helps them firm up, making it easier to coat them in chocolate. After dipping, allow them to chill again for another 15-20 minutes to set the chocolate. In total, you’ll spend around 50 minutes chilling your Oreo balls.
Total Time
In total, the entire process of making Oreo balls takes about 1 hour and 10 minutes. This includes 20 minutes of prep time and 50 minutes of chill time. With such a manageable time commitment, you can whip up these delicious treats for any occasion without feeling rushed. Enjoy the process and the delightful results!
Nutritional Information for Oreo Balls
Understanding the nutritional content of your treats can help you enjoy them more mindfully. Oreo balls are a delicious indulgence, but they also come with some nutritional facts worth noting. Here’s a breakdown of the calories, protein content, and sodium levels in these delightful treats.
Calories in Oreo Balls
Each Oreo ball contains approximately 100 calories. This number can vary slightly based on the specific ingredients you use, such as the type of chocolate or any additional toppings. While they are a sweet treat, enjoying them in moderation is key. Pairing them with healthier snacks can help balance your dessert experience!
Protein Content in Oreo Balls
Oreo balls are not a significant source of protein. Each ball typically contains about 1 gram of protein. The cream cheese does contribute some protein, but it’s not enough to make these treats a protein-rich snack. If you’re looking to boost the protein content, consider serving them alongside a protein-rich food, like yogurt or nuts.
Sodium Levels in Oreo Balls
The sodium content in Oreo balls is relatively low, with each ball containing around 50 milligrams of sodium. This is mainly due to the cream cheese and the Oreo cookies. For those watching their sodium intake, Oreo balls can be enjoyed as an occasional treat without significantly impacting your daily limits.
In summary, while Oreo balls are a delightful indulgence, they are best enjoyed in moderation. Being aware of their nutritional content can help you make informed choices while still enjoying these delicious bites!

FAQs About Oreo Balls
Can I use different types of cookies for Oreo Balls?
Absolutely! While traditional Oreo balls use classic Oreo cookies, you can get creative with different types of cookies. For instance, you can try using peanut butter cookies, mint-flavored cookies, or even chocolate chip cookies. Each type will give your Oreo balls a unique flavor and texture. Just remember to adjust the cream cheese accordingly to maintain the right consistency!
How long do Oreo Balls last in the fridge?
Oreo balls can last up to a week when stored properly in the refrigerator. Make sure to keep them in an airtight container to maintain their freshness. If you notice any changes in texture or smell, it’s best to discard them. Enjoy them while they’re fresh for the best taste!
Can I freeze Oreo Balls?
Yes, you can freeze Oreo balls! They freeze very well and can last for up to three months in the freezer. To freeze, place them in a single layer on a baking sheet until they are firm. Then, transfer them to a freezer-safe container. When you’re ready to enjoy them, simply thaw them in the refrigerator for a few hours. Avoid microwaving them, as this can cause the chocolate to melt unevenly.
What is the best way to melt chocolate for Oreo Balls?
The best way to melt chocolate for Oreo balls is to use a microwave-safe bowl. Heat the chocolate chips in 30-second intervals, stirring in between to ensure even melting. This method helps prevent the chocolate from burning. If you prefer, you can also use a double boiler on the stove for a more controlled melting process. Just remember to keep the heat low to avoid scorching the chocolate!
Conclusion
Recap of Why Oreo Balls Are a Must-Try Treat
In conclusion, Oreo balls are a delightful and versatile treat that everyone can enjoy. Their simple ingredients and easy preparation make them a favorite for both novice and experienced bakers. Whether you’re celebrating a special occasion or just looking for a sweet snack, these no-bake desserts are sure to impress.
With their rich chocolate flavor, creamy center, and endless customization options, Oreo balls can be tailored to suit any taste. From classic flavors to creative variations, there’s an Oreo ball for everyone. Plus, they are perfect for sharing at parties, gatherings, or even enjoying at home during a cozy movie night.
So, why not give Oreo balls a try? With just a little time and effort, you can create a delicious treat that will bring smiles to faces young and old. Enjoy the process, experiment with flavors, and most importantly, savor every bite of these delightful treats!

Oreo Balls
Ingredients
Equipment
Method
-
Crush the Oreo cookies using a food processor or a rolling pin in a zip-top bag until fine crumbs.
-
Mix the crushed Oreos with softened cream cheese in a large bowl until well combined.
-
Scoop out about a tablespoon of the mixture and roll it into a ball. Place on a parchment-lined baking sheet.
-
Chill the balls in the refrigerator for about 30 minutes to firm up.
-
Melt the chocolate chips in a microwave-safe bowl in 30-second intervals, stirring in between.
-
Dip each chilled ball into the melted chocolate, ensuring it is fully coated, then place back on the baking sheet.
-
Chill the coated balls for another 15-20 minutes until the chocolate is set.
-
Serve and enjoy your Oreo balls!