Crispy chicken taquitos have a way of vanishing from the plate before you even sit down at the table. I made my first batch on a cold Tuesday night when I had leftover rotisserie chicken in the fridge and no plan for dinner. Within 30 minutes, my whole kitchen smelled like a Tex-Mex restaurant, and my nephew was already reaching for his third one before I even grabbed the camera.
Growing up in a small Midwest town, handheld food was the heart of every family gathering. Sunday afternoons at my grandmother’s farm meant big platters of food you could pick up and eat while talking and laughing. That same energy lives in these taquitos. You take simple, humble ingredients, roll them up tight, and let a hot skillet do all the work. The outside turns golden and crackly, the inside stays creamy and loaded with seasoned chicken and melted cheese. My grandmother would have approved. Get your skillet ready because your kitchen is about to smell incredible.

Why Crispy Chicken Taquitos Belong in Your Recipe Box
These crispy chicken taquitos work just as well for a quick Tuesday dinner as they do for a party spread. They use ingredients you likely already have, the technique is beginner-friendly, and the results are genuinely crowd-pleasing every single time.
- Ready in just 35 minutes from start to finish
- Uses pantry staples and leftover or rotisserie chicken
- Bake or fry option for every preference
- Make-ahead friendly and freezer approved for up to 2 months
- Fully customizable with your favorite spice level and toppings
- Great for parties, game nights, meal prep, or a casual weeknight dinner
Key Players in This Recipe
Every ingredient in these crispy chicken taquitos pulls its weight. Here is what you need and why each item matters for the final result.
Cooked Shredded Chicken (2 cups): The protein-rich foundation of the filling. Leftover rotisserie chicken works especially well because the seasoning is already built in, which saves you time and adds depth.
Shredded Cheddar Cheese (1 cup): Melts into gooey pockets and adds a satisfying sharpness that balances the creamy elements. Sharp cheddar gives you the most flavor.
Cream Cheese, softened (1/2 cup): Binds the filling together and gives each taquito a silky, creamy center. Let it sit at room temperature for 20 minutes before mixing so it blends smoothly without lumps.
Sour Cream (1/4 cup): Adds moisture and just enough tang to keep the filling from feeling heavy or dry, even after frying.
Garlic Powder (1/2 tsp): Builds a warm, savory base without overpowering the chicken.
Onion Powder (1/2 tsp): Adds subtle sweetness and rounds out the overall savory flavor naturally.
Cumin (1/2 tsp): That earthy, slightly smoky warmth that defines Tex-Mex cooking. Do not skip it.
Chili Powder (1/4 tsp): A gentle kick and a hint of paprika sweetness to complete the spice blend.
Salt and Pepper (to taste): They bring out the natural flavor in every other ingredient. Season the filling and taste it before rolling.
Small Flour Tortillas (10): Flexible enough to roll tightly without cracking and they crisp up beautifully in the oil. Corn tortillas can be substituted if you warm them first.
Vegetable Oil (for frying): A neutral oil ensures even, golden browning. You need about 1 inch of oil in the skillet.
How to Make Crispy Chicken Taquitos Step by Step
Follow these steps carefully and you will have a golden, crunchy platter of crispy chicken taquitos in under 35 minutes. I have made these dozens of times and ironed out every hiccup so your first batch comes out right.
- Step 1: In a large mixing bowl, combine the shredded chicken, cheddar cheese, softened cream cheese, and sour cream. Mix until fully combined and the filling looks smooth and cohesive.
- Step 2: Season the mixture with garlic powder, onion powder, cumin, chili powder, salt, and pepper. Stir thoroughly so every piece of chicken is coated in the spice blend. Taste and adjust seasoning before rolling.
- Step 3: Lay a small flour tortilla flat on a clean surface. Spoon 2 to 3 tablespoons of the chicken filling onto the lower third of the tortilla, leaving about half an inch clear at the edges.
- Step 4: Roll the tortilla snugly around the filling, forming a tight cylinder. Place seam-side down on a sheet tray. Rolling tight is the key to taquitos that hold together during frying. Repeat with all remaining tortillas and filling.
- Step 5: In a large skillet, heat about 1 inch of vegetable oil over medium-high heat. Test readiness by dipping the edge of a tortilla into the oil. If it sizzles right away, the oil is ready.
- Step 6: Carefully place a few taquitos seam-side down in the hot oil. Fry until the bottom is golden brown and crispy, about 2 to 3 minutes, then use tongs to flip and crisp the other side. Starting seam-side down seals the roll before it sets.
- Step 7: Remove the taquitos and transfer to a paper-towel-lined plate to drain excess oil. Fry remaining taquitos in batches, keeping the oil temperature consistent between each batch. Do not crowd the pan.
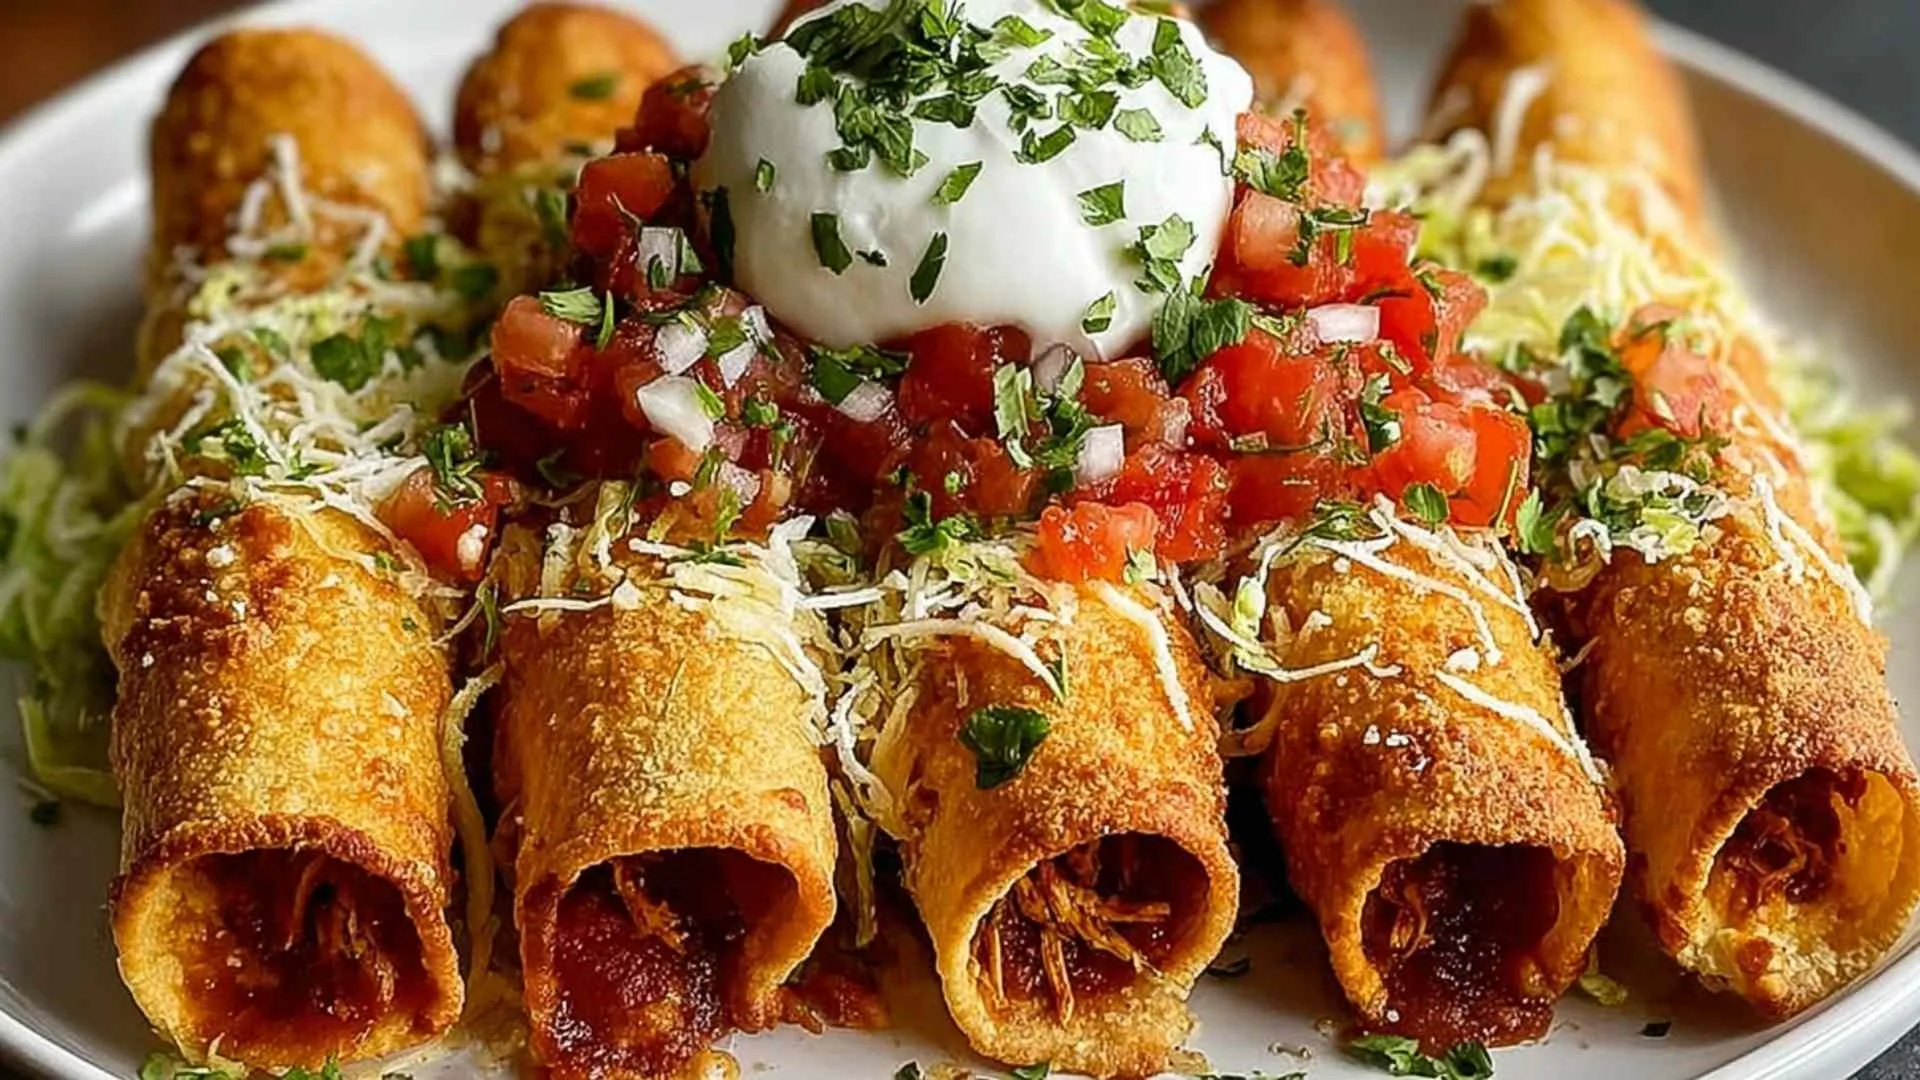
- Step 8: Serve warm with your choice of toppings including fresh salsa, creamy guacamole, sour cream, and chopped cilantro.
Important Notes
- Chicken: Leftover cooked chicken or rotisserie chicken works perfectly and saves time.
- Tortillas: Corn tortillas can be substituted. Warm them in a damp paper towel in the microwave for 30 seconds first so they roll without cracking.
- Spice level: Add 2 tablespoons of finely chopped pickled jalapenos to the filling for extra heat.
- Make ahead: Taquitos can be rolled and refrigerated up to 24 hours before frying. They hold their shape better after a short rest.
- Lighter option: Bake at 400 degrees F for 15 to 20 minutes, flipping halfway, instead of frying.
Tips for Best Results
- Test oil temperature by dipping the edge of a tortilla. It should sizzle immediately.
- Always place taquitos seam-side down first to seal them during frying.
- Fry in batches to maintain oil temperature and ensure even crispiness.
- Do not overcrowd the skillet. Crowding drops the oil temp and leads to greasy taquitos.

How to Store and Reheat Crispy Chicken Taquitos
One of the best things about this recipe is how well it holds up for meal prep. I store leftover taquitos in an airtight container in the fridge and they stay good for up to 3 days. To bring back the crunch, reheat them in a hot skillet with a touch of oil for 3 to 4 minutes per side, or in the oven at 350 degrees F for 8 to 10 minutes. The microwave works in a pinch but you will lose the crispy exterior.
For freezing, arrange uncooked rolled taquitos on a parchment-lined baking sheet and flash freeze for about one hour until firm. Transfer to a resealable freezer bag, press out as much air as possible, and store for up to 2 months. Fry straight from frozen by adding 2 to 3 extra minutes to the cook time, or bake at 400 degrees F for 20 to 25 minutes. A freezer batch of these is one of the smartest meal prep moves you can make.
For air fryer reheating, set to 375 degrees F and cook for 3 to 4 minutes. It is the fastest way to get that satisfying crunch back into a refrigerated taquito.
What to Serve with Crispy Chicken Taquitos
These taquitos are a natural centerpiece but the right sides turn them into a full Tex-Mex meal. Here are some pairings that work well, including a few recipes from the Nonna Food kitchen.
- Fresh salsa and guacamole for dipping
- Extra sour cream and chopped cilantro for garnish
- Easy Rotisserie Chicken Enchiladas for a full Tex-Mex spread on the same table
- Loaded Potato Taco Bowl for a hearty side that complements the crispy taquito texture
- White Chicken Chili Tacos for another handheld option your guests will love alongside these
- Easy Taco Rice Bowl for a filling base that pairs naturally with Tex-Mex flavors
- Spicy Mexican Donkey Balls for an extra spicy appetizer to serve alongside
- Chilled margaritas or iced horchata to balance the warm spices
FAQs
Yes. Bake at 400 degrees F for 15 to 20 minutes, flipping halfway through. You get a lighter result that is still satisfyingly crispy.
Yes. Roll them, cover with plastic wrap, and refrigerate for up to 24 hours before frying. They hold their shape even better after a short rest.
Leftover rotisserie chicken is the top choice for flavor and convenience. Any cooked shredded chicken works including poached or baked chicken breast.

Crispy Chicken Taquitos
Ingredients
Equipment
Method
-
In a large mixing bowl, combine the shredded chicken, cheddar cheese, softened cream cheese, and sour cream. Mix until fully combined and the filling looks smooth.
-
Season the mixture with garlic powder, onion powder, cumin, chili powder, salt, and pepper. Stir thoroughly. Taste and adjust seasoning before rolling.
-
Lay a tortilla flat on a clean surface. Spoon 2 to 3 tablespoons of the chicken mixture onto the lower third of the tortilla, leaving half an inch clear at the edges.
-
Roll the tortilla tightly around the filling, forming a neat cylinder. Place seam-side down on a sheet tray. Repeat with remaining tortillas and filling.
-
In a large skillet, heat about 1 inch of vegetable oil over medium-high heat. Test by dipping the edge of a tortilla in the oil. It should sizzle immediately.
-
Carefully place a few taquitos seam-side down in the hot oil. Fry until golden brown and crispy, about 2 to 3 minutes per side.
-
Remove taquitos and drain on a paper-towel-lined plate. Fry remaining taquitos in batches, keeping the oil temperature consistent. Do not crowd the pan.
-
Serve warm with salsa, guacamole, sour cream, and chopped cilantro.


