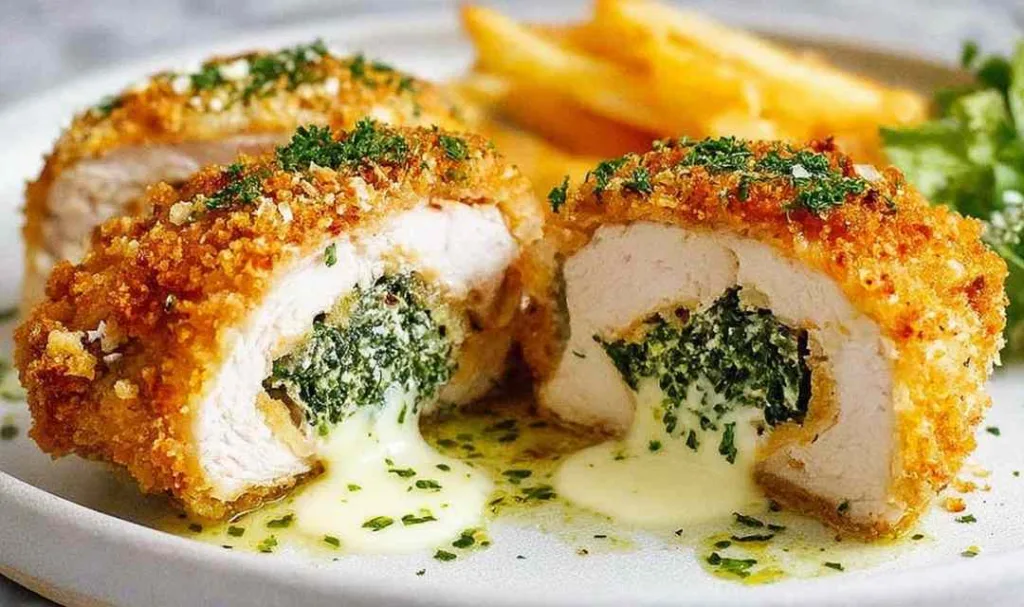
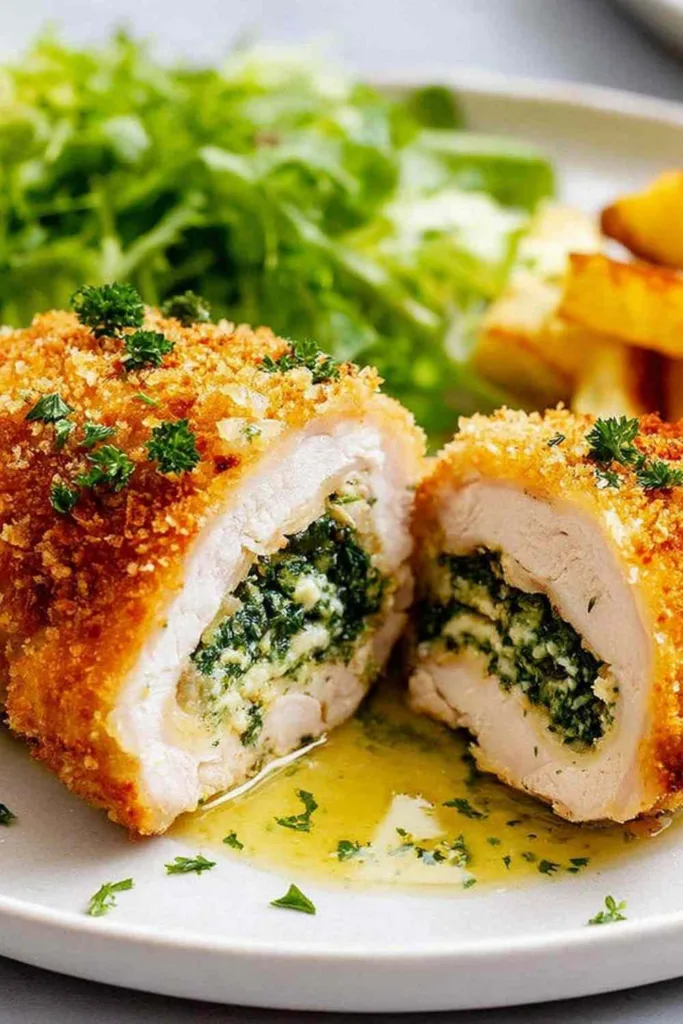
There is something about a good Chicken Kiev recipe that stops a dinner table cold. I still remember the first time I watched that golden log of crumbed chicken get cut open at a church potluck back in the late seventies. A woman named Irene set it down without ceremony, sliced right through the crust, and a warm river of garlic butter came pouring out across the plate. Every single person leaned in. I have been chasing that moment in my own kitchen ever since.
Growing up on our Midwest farm, Sunday dinner had one job: it had to earn its place at the table. It had to fill the house with a smell that pulled everyone in from whatever they were doing. And it had to feel like something, not just fuel. Chicken Kiev does all of that. The crispy panko crust, the juicy chicken, and that hidden pocket of herb-laced garlic butter make every bite feel like a small event. The trick that keeps all that butter locked inside is a simple one: two short trips to the freezer, and your Kiev holds together through the fryer and the oven without losing a drop. Your kitchen is about to smell wonderful. Time to get your hands a little floury.
Why This Chicken Kiev Recipe Belongs in Your Recipe Box
This is one of those recipes that looks far more impressive than the effort it actually requires. Once you understand the method, the whole thing comes together with pantry staples and basic technique. Betty has made this for family gatherings, weeknight dinners, and more than a few potlucks, and it has never once disappointed.
- That garlic butter moment: Cutting into the golden crust and watching the butter pour out is one of the best things you can do at a dinner table. It never gets old.
- Pantry-friendly ingredients: Butter, garlic, eggs, flour, and breadcrumbs. Nothing exotic, nothing hard to find at your regular grocery store.
- Ready in under 90 minutes: Most of that is hands-off freezing time. Active prep is around 25 to 30 minutes total.
- No deep-fry anxiety needed: A fully baked option using pre-toasted panko delivers real crunch without a pot of hot oil. Details in the tips section below.
- Make-ahead friendly: Crumb the Kievs, freeze them, and you have dinner half-done days in advance. Great for entertaining without the stress.
- Restaurant quality at home: The partial freezing technique is the professional trick that keeps everything sealed and perfectly golden every single time.
Key Players in This Chicken Kiev Recipe
The beauty of this dish is how much work each simple ingredient quietly does. Here is what Betty always keeps in mind when pulling everything together.
Unsalted butter (softened): The heart of the whole recipe. Softened butter blends smoothly with the garlic and parsley, then firms back up into a clean baton in the fridge. I always choose unsalted so I can control the salt level precisely. That control matters here more than in most recipes.
Fresh garlic (very finely minced): I have learned that almost-paste-level minced garlic distributes far more evenly through the butter than anything coarsely chopped. Two cloves give you that bold, unmistakable Kiev flavor without overwhelming the chicken.
Fresh flat-leaf parsley: Parsley does more than add color. It lifts the richness of the butter with a clean, grassy brightness. Chop it as fine as you can. Larger pieces can catch on the chicken and cause small tears as you roll.
Chicken breast (7 to 8 oz each): This size is the sweet spot. Large enough to pound into a wide, even sheet for rolling, but not so thick that the inside struggles to cook through evenly. Try to match the two breasts in size so they finish at the same time.
Panko breadcrumbs: Worth seeking out specifically for this recipe. The larger, airier flakes create a shatteringly crispy crust that regular breadcrumbs simply cannot match. Check the Asian foods aisle at most grocery stores. Regular breadcrumbs can be substituted if needed, but panko is the goal.
Egg and all-purpose flour: These two form the binding system that anchors the breadcrumbs to the chicken through both frying and baking. Flour first to create a dry base, then egg as the glue. Together they give the panko something to really hold onto.
Canola or vegetable oil: A neutral, high-smoke-point oil is essential for frying. Canola lets the garlic butter and the golden crust take center stage without any competing flavors.
How to Make This Chicken Kiev Recipe Step by Step
Follow these steps carefully and you will have a perfect result every time. The two partial freezing steps might feel like extra effort, but they are genuinely the difference between a Kiev that holds together beautifully and one that loses all its butter in the oil.
Step 1 – Make the garlic butter Mix softened butter, finely chopped parsley, minced garlic, and salt in a bowl until completely smooth and combined. I always taste the butter at this stage. It should be rich, garlicky, and just salty enough to season the chicken from the inside out.
Step 2 – Shape and chill the butter Spread the butter onto a sheet of parchment paper and shape it into a roughly 4 by 2.4-inch rectangle. Refrigerate until firm, then cut lengthwise into two equal batons. Well-chilled butter holds its shape far better when you are rolling the chicken tightly around it.
Step 3 – Pound the chicken Place each breast smooth-side down between two freezer bags and pound to an even quarter-inch thickness using a meat mallet or rolling pin. Aim for a rectangle shape as best you can. Through trial and error, I have learned that patching small tears with scraps of chicken works perfectly well, so do not panic if a small hole appears.
Step 4 – Season and stuff Sprinkle both sides of each breast with salt and pepper. Place one butter baton in the center. Fold the sides in over the butter, then roll from the bottom up like a burrito, finishing seam-side down. The seam-side-down rule is non-negotiable. That is what keeps everything sealed.
Step 5 – First partial freeze Wrap each roll tightly in plastic wrap, twisting the ends firmly to form a log shape. Freeze for 30 minutes until the surface is firm to the touch but not rock solid. This step is what keeps the chicken sealed when you crumb and fry it. Do not skip it.
Step 6 – Crumb the chicken Set up three bowls: flour, whisked egg, and panko breadcrumbs. Coat each Kiev in flour and shake off the excess. Then coat in egg and let the drips fall. Then press firmly into the breadcrumbs on all sides including both ends. Press the panko in with your palm rather than just rolling. You want it to really stick.
Step 7 – Second partial freeze Return the crumbed Kievs to the freezer for another 30 minutes. This second freeze firms up the crumb coating so it does not shift or fall away when you lower the chicken into hot oil.
Step 8 – Preheat the oven Set your oven to 350 degrees F and place a wire rack on a baking tray. Having this ready before you start frying means the chicken goes straight from the pot to the oven without losing any heat.
Step 9 – Fry until golden Heat oil in a heavy pot to 375 degrees F. Carefully lower each Kiev into the oil and cook for 2 to 3 minutes, turning once or twice, until deeply golden all over. The inside will still be raw at this point. That is exactly right and exactly what you want.
Step 10 – Bake to finish Transfer the fried Kievs to the wire rack and bake for 15 minutes, or until the internal temperature reaches 150 degrees F. When using a thermometer, pierce only partway through the top of the chicken. Going all the way through creates a hole that lets the butter escape before it ever reaches the plate.
Step 11 – Rest and serve Rest for 2 minutes, then sprinkle with finely chopped parsley and serve immediately. That 2-minute rest builds the anticipation. Then you cut in, and the butter comes flooding out across the plate.
Tips for the Best Chicken Kiev Every Time
- Pound the chicken as evenly as possible. Thin spots tear easily and give the butter an escape route during rolling.
- Do not overstuff. The butter baton should sit comfortably in the center with room to fold the sides over cleanly. Too much and it will leak.
- Keep the seam-side down during both frying and baking without exception.
- Use a slotted spoon to lift the Kiev from the oil. Tongs grip the crust and knock it off.
- For the no-fry baked version, toast panko breadcrumbs lightly sprayed with cooking oil in a 350 degree oven until golden. Let them cool completely before crumbing the Kiev. Then bake for 20 minutes total. The result is genuinely impressive and much less intimidating than frying.
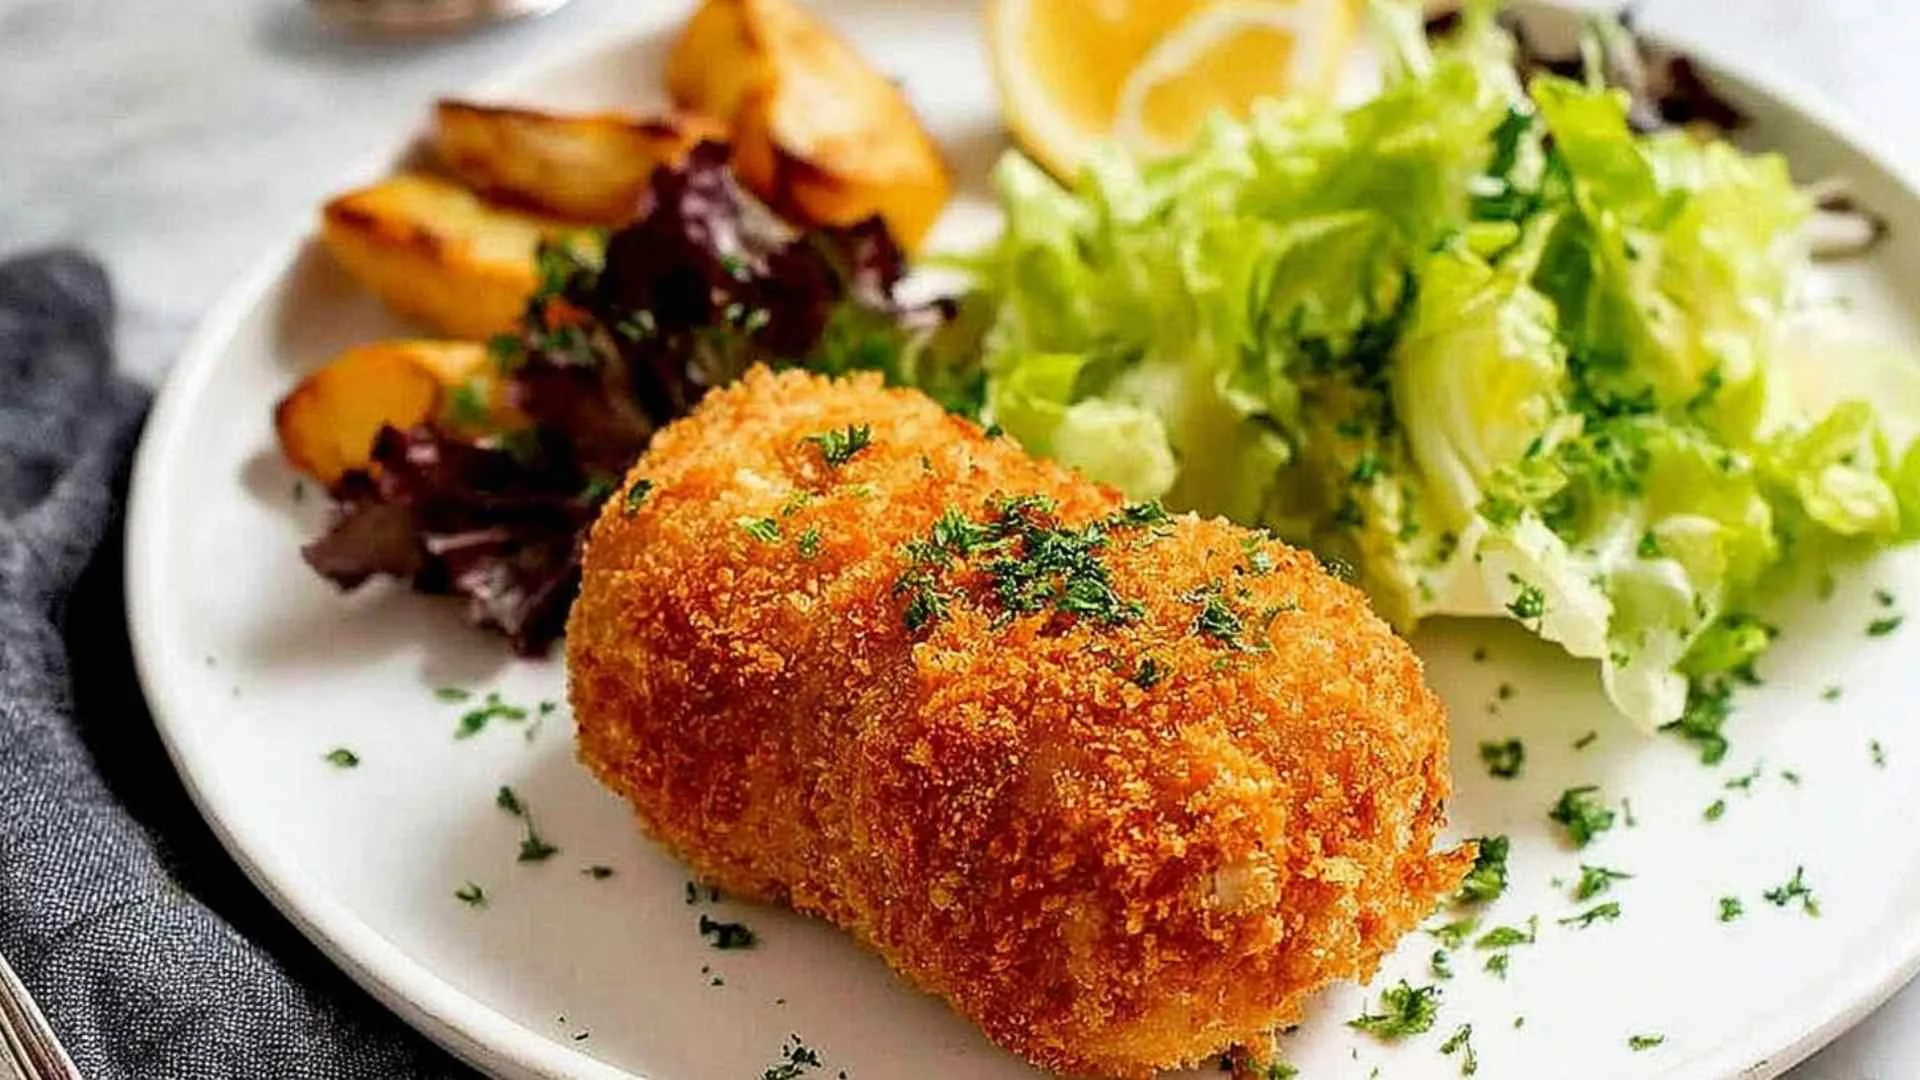
What to Serve with Chicken Kiev
Because the Kiev is rich and deeply buttery, the best sides either soak up that garlic butter or bring enough freshness to cut through the richness. Here is what works best at the Harper table.
Creamy mashed potatoes are the classic pairing for very good reason. Pile them on the plate and let the garlic butter pool into them when you cut the Kiev open. Nothing better.
Crispy garlic parmesan Brussels sprouts add real crunch and a slight bitterness that balances the richness of the butter beautifully and keeps the meal from feeling heavy.
Easy honey glazed carrots and green beans bring a gentle natural sweetness that plays off the savory garlic butter in a way that just works every single time.
Garlic parmesan artisan bread is simple and in this house it is considered essential. Something crusty to mop up every last drop of butter on the plate is not optional.
Creamy scalloped potatoes make this feel like a proper special-occasion dinner. Rich, layered, and a natural match for buttery chicken.
Lemon garlic butter chicken and green beans style green beans on the side bring brightness and a clean snap that cuts through the richness of the Kiev without competing with its flavors.
A simple green salad with a sharp vinaigrette works beautifully as well. The acidity keeps the overall meal feeling balanced and fresh.
Storing and Reheating Your Chicken Kiev
I typically store leftover Kievs in an airtight container in the refrigerator where they keep well for up to 3 days. The crust softens a little overnight, but 10 to 12 minutes in a 350 degree oven brings it right back to crispy. Avoid the microwave if you can. It steams the crumb coating and you lose the crunch entirely.
For longer storage, this Chicken Kiev recipe freezes well at the crumbed stage before frying. Wrap each roll individually in plastic wrap and place in a zip-lock freezer bag. They keep for up to 2 months. The partial freeze you already did during prep makes the chicken extremely stable in the freezer, so this extra step is easy.
To cook from frozen, fry straight from the freezer adding about one extra minute to the frying time, then bake for 20 to 22 minutes rather than 15. Always check that the internal temperature reaches 150 degrees F before serving.
FAQs
The most common cause is skipping or shortening one of the partial freezing steps. Do not rush either 30-minute freeze. They are what keeps the seams firmly in place through frying and baking. If you skip them, the seams shift and the butter escapes.
Yes. Toast panko breadcrumbs with a light spray of cooking oil in a 350 degree oven until golden and crispy. Let them cool completely, then crumb your Kiev as normal and bake for 20 minutes total. Betty’s baked version is genuinely crispy and very impressive for a no-fry result.
Absolutely. Crumb the Kievs and freeze them before frying for up to 2 months ahead. Or refrigerate after the second partial freeze for up to 24 hours before cooking. Both approaches make this a great recipe for stress-free entertaining.

Chicken Kiev Recipe
Ingredients
Equipment
Method
-
Mix softened butter, parsley, garlic, and salt in a bowl until fully combined and smooth.
-
Spread butter onto parchment paper into a roughly 4 by 2.4-inch rectangle. Refrigerate until firm, then cut lengthwise into 2 equal batons.
-
Place each chicken breast smooth-side down between two freezer bags. Pound to an even quarter-inch thickness. Patch any small tears with chicken scraps.
-
Sprinkle both sides of each chicken breast with salt and pepper.
-
Place one butter baton in the center of each breast. Fold sides in over the butter, then roll from the bottom up, finishing seam-side down.
-
Wrap each roll tightly in plastic wrap, twisting the ends to form a firm log. Freeze for 30 minutes until the surface is firm but not frozen solid.
-
Coat each Kiev in flour and shake off excess. Then coat in whisked egg. Then press firmly into panko breadcrumbs on all sides including both ends.
-
Return crumbed Kievs to the freezer for another 30 minutes.
-
Preheat oven to 350 degrees F. Place a wire rack on a baking tray.
-
Heat oil in a heavy pot to 375 degrees F. Carefully fry each Kiev for 2 to 3 minutes, turning once or twice, until golden all over. The inside will still be raw at this stage.
-
Transfer to the wire rack and bake for 15 minutes or until the internal temperature reaches 150 degrees F. Pierce the thermometer only partway through the top to avoid butter leakage.
-
Rest for 2 minutes, sprinkle with chopped parsley, and serve immediately.


