Starbucks Cake Pops
Starbucks cake pops are delightful treats that have captured the hearts of many. These small, round desserts are not only tasty but also visually appealing. They come in various flavors and colors, making them perfect for any occasion. In this article, we’ll explore what cake pops are, their popularity, and why you might want to make them at home.

What Are Starbucks Cake Pops?
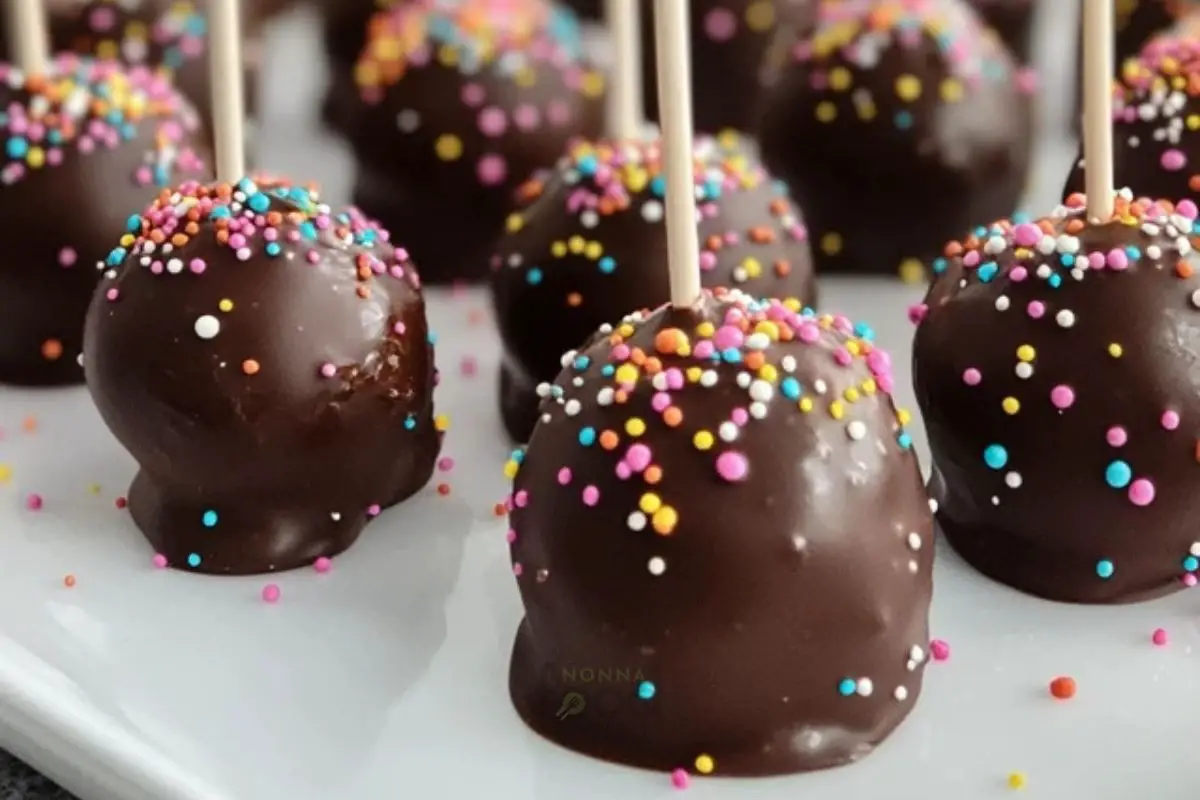
Starbucks cake pops are bite-sized desserts made from cake crumbs mixed with frosting. This mixture is then shaped into balls, coated in chocolate, and placed on a stick. They often feature fun designs and vibrant colors, making them a favorite among both kids and adults. Each cake pop is a little piece of joy, perfect for a quick snack or a sweet treat with your coffee.
The Popularity of Cake Pops
Cake pops have gained immense popularity over the years. Their unique shape and fun presentation make them a hit at parties and celebrations. People love how easy they are to eat, and they can be customized for any event. From birthdays to weddings, cake pops add a special touch. Additionally, their small size allows for guilt-free indulgence, making them a go-to dessert for many.
Why Make Starbucks Cake Pops at Home?
Making Starbucks cake pops at home can be a rewarding experience. First, it allows you to control the ingredients, ensuring they are fresh and delicious. You can also experiment with flavors and decorations, making each batch unique. Plus, it’s a fun activity to do with family or friends. Imagine creating your own cake pops while enjoying laughter and good company!
Moreover, homemade cake pops can save you money. Buying them at Starbucks can add up quickly, especially if you enjoy them often. By making them at home, you can create a large batch for a fraction of the cost. So, gather your ingredients and get ready to make some delightful cake pops!
Ingredients Needed for Starbucks Cake Pops
Making Starbucks cake pops at home is a delightful experience. First, you need to gather all the necessary ingredients. This ensures that your cake pops turn out delicious and visually appealing. Let’s dive into the essential ingredients you’ll need.
Essential Ingredients
When it comes to cake pops, the right ingredients make all the difference. Here’s a breakdown of what you’ll need.
Cake Mix Options
Choosing the right cake mix is crucial. You can opt for classic flavors like chocolate or vanilla. Alternatively, you might want to try red velvet or lemon for a twist. Just remember, the flavor of the cake will shine through in your cake pops.
Frosting Choices
Frosting is the glue that holds your cake pops together. You can use store-bought frosting for convenience. However, homemade frosting can add a personal touch. Cream cheese frosting pairs wonderfully with red velvet, while buttercream complements chocolate perfectly.
Coating and Toppings
The coating is what gives your cake pops that signature look. You can use chocolate melts or candy coating. These come in various colors, allowing for creativity. For toppings, consider sprinkles, crushed nuts, or even coconut flakes. They add texture and flavor.
Tools and Equipment Required
Having the right tools makes the process smoother. Here’s what you’ll need to create your cake pops.
Mixing Bowls and Utensils
Start with mixing bowls to combine your cake and frosting. A spatula or wooden spoon will help you mix everything evenly. Make sure to have a whisk handy for any frosting you decide to make from scratch.
Cake Pop Molds and Sticks
Cake pop molds are essential for shaping your treats. They come in various sizes and shapes. Additionally, you’ll need cake pop sticks to hold your pops. These sticks should be sturdy enough to support the weight of the cake.
Melting Pot or Microwave
To melt your chocolate or candy coating, you can use a melting pot or microwave. A melting pot provides even heat, reducing the risk of burning. If you use a microwave, heat in short bursts, stirring in between to ensure smooth melting.
With these ingredients and tools, you’re well on your way to making delicious Starbucks cake pops at home. Enjoy the process and have fun experimenting with flavors and decorations!
Step-by-Step Guide on How to Make Starbucks Cake Pops
Making Starbucks cake pops at home is a fun and rewarding experience. With a few simple steps, you can create delicious treats that are perfect for any occasion. Let’s dive into the process!
Baking the Cake
Preparing the Cake Mix
First, gather your ingredients. You’ll need cake mix, eggs, oil, and water. Follow the instructions on the cake mix box. Mix everything in a bowl until smooth. It’s important to blend well to avoid lumps. You can also add a splash of vanilla extract for extra flavor.
Baking Instructions
Preheat your oven to 350°F (175°C). Grease a baking pan with cooking spray. Pour the cake batter into the pan. Bake for about 25-30 minutes. Check if it’s done by inserting a toothpick. If it comes out clean, your cake is ready!
Crumbling the Cake
How to Properly Crumble the Cake
Once the cake cools, it’s time to crumble it. Use your hands to break the cake into small pieces. Make sure there are no large chunks left. This step is crucial for the next part of the process. A fine crumble will help the cake pops hold together better.
Mixing with Frosting
Achieving the Right Consistency
Now, add frosting to the crumbled cake. Start with a small amount and mix it in. You want a dough-like consistency. If it’s too dry, add more frosting. If it’s too wet, add more cake crumbs. The right mix will help your cake pops stay firm.
Shaping the Cake Pops
Forming the Balls
Take small portions of the mixture and roll them into balls. Aim for about one inch in diameter. This size is perfect for cake pops. Make sure they’re smooth and round. This will help them look nice when coated.
Inserting the Sticks
Next, take lollipop sticks and insert them into each ball. Push them in about halfway. This will help the sticks stay in place when you dip them later. Place the shaped cake pops on a baking sheet lined with parchment paper.
Coating the Cake Pops
Melting the Coating
For the coating, you can use chocolate or candy melts. Melt them in a microwave-safe bowl. Heat in short bursts, stirring in between. This prevents burning. You want a smooth, pourable consistency.
Dipping Techniques
Once melted, dip each cake pop into the coating. Make sure to cover it completely. Gently tap the stick to remove excess coating. This will help avoid drips. It’s important to work quickly before the coating hardens.
Adding Toppings
While the coating is still wet, sprinkle your favorite toppings. You can use sprinkles, crushed nuts, or coconut flakes. Get creative! This adds a fun touch to your cake pops.
Setting and Storing Cake Pops
Cooling and Hardening Process
After coating, place the cake pops upright in a foam block or a cup. Let them cool completely. This will help the coating harden. It usually takes about 30 minutes. Once set, they’re ready to enjoy!
Best Storage Practices
To store your cake pops, keep them in an airtight container. They can last up to a week at room temperature. If you want to keep them longer, refrigerate them. Just remember to let them come to room temperature before serving.
Now you know how to make Starbucks cake pops! Enjoy your delicious creations with friends and family. Happy baking!
Tips and Tricks for Perfect Starbucks Cake Pops
Making Starbucks-style cake pops at home can be a delightful experience. With the right tips and tricks, you can create delicious treats that resemble those from your favorite coffee shop. First, always use moist cake. A dry cake will lead to crumbly pops. Next, ensure you crumble the cake finely. This helps in binding the mixture together. Additionally, don’t skip the frosting. It’s essential for achieving the right consistency.
When dipping your cake pops in chocolate, make sure the coating is warm but not too hot. This prevents the cake from falling off the stick. Also, use a styrofoam block to hold the pops upright while they set. This keeps them looking neat and professional. Lastly, practice patience. Allow the pops to cool completely before decorating. This ensures that your decorations stick well.
Common Mistakes to Avoid
Even the best bakers can make mistakes. One common error is using too much frosting. This can make the cake pops overly sweet and difficult to shape. Another mistake is not chilling the cake mixture long enough. Chilling helps the pops hold their shape during dipping.
Also, avoid using chocolate that’s too thick. Thin it out with a little vegetable oil for a smoother coating. Lastly, don’t rush the cooling process. If you dip warm cake pops, they may fall apart. So, take your time and enjoy the process!
Variations and Flavor Ideas
There are endless possibilities when it comes to cake pop flavors. You can easily customize them to suit your taste. Here are some popular variations:
Chocolate Cake Pops
Chocolate cake pops are a classic favorite. Start with a rich chocolate cake and mix it with chocolate frosting. Dip them in dark or milk chocolate for a decadent treat. You can also sprinkle some crushed nuts or chocolate shavings on top for added texture.
Vanilla Cake Pops
For a lighter option, try vanilla cake pops. Use a fluffy vanilla cake and mix it with vanilla frosting. Dip them in white chocolate for a sweet finish. You can also add colorful sprinkles to make them festive and fun!
Seasonal Flavors
Don’t forget about seasonal flavors! Pumpkin spice cake pops are perfect for fall. Use pumpkin cake and cream cheese frosting, then dip in white chocolate. For winter, try peppermint cake pops. Just add crushed peppermint candies on top for a refreshing twist.
Decorating Ideas for Cake Pops
Decorating your cake pops can be just as fun as making them! Use different colored chocolate melts to create beautiful designs. You can drizzle contrasting colors over the pops for a stylish look. Additionally, edible glitter or sprinkles can add a festive touch.
For a more personalized touch, consider using fondant decorations. You can shape fondant into fun designs like hearts or stars. This adds a unique flair to your cake pops. Lastly, don’t forget to package them nicely if you’re giving them as gifts. A simple clear bag tied with a ribbon can make your cake pops look extra special.

Frequently Asked Questions (FAQs) about Starbucks Cake Pops
How long do Starbucks cake pops last?
Starbucks cake pops are delightful treats that can last for a while. Typically, they stay fresh for about 5 to 7 days when stored properly. To keep them at their best, place them in an airtight container. This helps maintain their moisture and flavor. If you notice any changes in texture or smell, it’s best to toss them out. Always remember, freshness is key to enjoying these sweet bites!
Can I freeze Starbucks cake pops?
Yes, you can freeze Starbucks cake pops! Freezing them is a great way to extend their shelf life. To do this, wrap each cake pop in plastic wrap. Then, place them in a freezer-safe bag or container. When you’re ready to enjoy them, simply take them out and let them thaw in the fridge. This method helps preserve their taste and texture. Just be sure to consume them within a month for the best experience!
What is the best way to transport cake pops?
Transporting cake pops can be tricky, but it’s doable! First, make sure they are completely set and dry. Then, use a sturdy box or container with dividers. This prevents them from rolling around and getting damaged. You can also use a cake pop stand if you have one. If you’re traveling a long distance, consider placing ice packs in the container to keep them cool. With these tips, your cake pops will arrive safely and deliciously!
Can I use homemade cake instead of cake mix?
Absolutely! Using homemade cake instead of cake mix is a fantastic idea. It allows you to customize flavors and ingredients. Just make sure the cake is moist enough to form into balls. Crumble the cake finely and mix it with frosting to achieve the right consistency. This way, you can create cake pops that are truly unique and delicious. Plus, it adds a personal touch to your treats!
Are there gluten-free options for cake pops?
Yes, there are gluten-free options for cake pops! Many people enjoy these treats without gluten. You can use gluten-free cake mixes available in stores. Alternatively, you can make your own gluten-free cake from scratch. Just ensure all ingredients are gluten-free. This way, everyone can enjoy the sweet goodness of cake pops, regardless of dietary restrictions. It’s all about making delicious treats for everyone!
Conclusion
Recap of the Cake Pop Making Process
Making Starbucks cake pops at home is a fun and rewarding experience. First, you start by baking a cake. You can use any flavor you love, like chocolate or vanilla. Once the cake cools, crumble it into fine pieces. Then, mix in frosting to create a dough-like consistency. After that, roll the mixture into small balls. Next, insert a stick into each ball and chill them in the fridge. Finally, dip the chilled cake pops into melted chocolate and decorate them as you wish. This simple process allows you to enjoy delicious treats right from your kitchen.
Encouragement to Experiment with Flavors and Designs
Don’t be afraid to get creative! Experimenting with different flavors and designs can make your cake pops even more exciting. Try using different cake flavors, like red velvet or lemon. You can also mix in unique ingredients, such as sprinkles or nuts. When it comes to decorating, the sky’s the limit! Use colored chocolate melts, edible glitter, or even fun shapes. Each batch can be a new adventure. So, gather your ingredients and let your imagination run wild. You might just create the next big hit in cake pops!
