Introduction to Cake Pops
Cake pops are a delightful treat that combines the joy of cake with the fun of lollipops. These bite-sized desserts are perfect for any occasion, from birthday parties to holiday gatherings. They are not only tasty but also visually appealing, making them a favorite among both kids and adults. With their colorful coatings and endless decorating possibilities, cake pops can brighten up any celebration.
What Are Cake Pops?
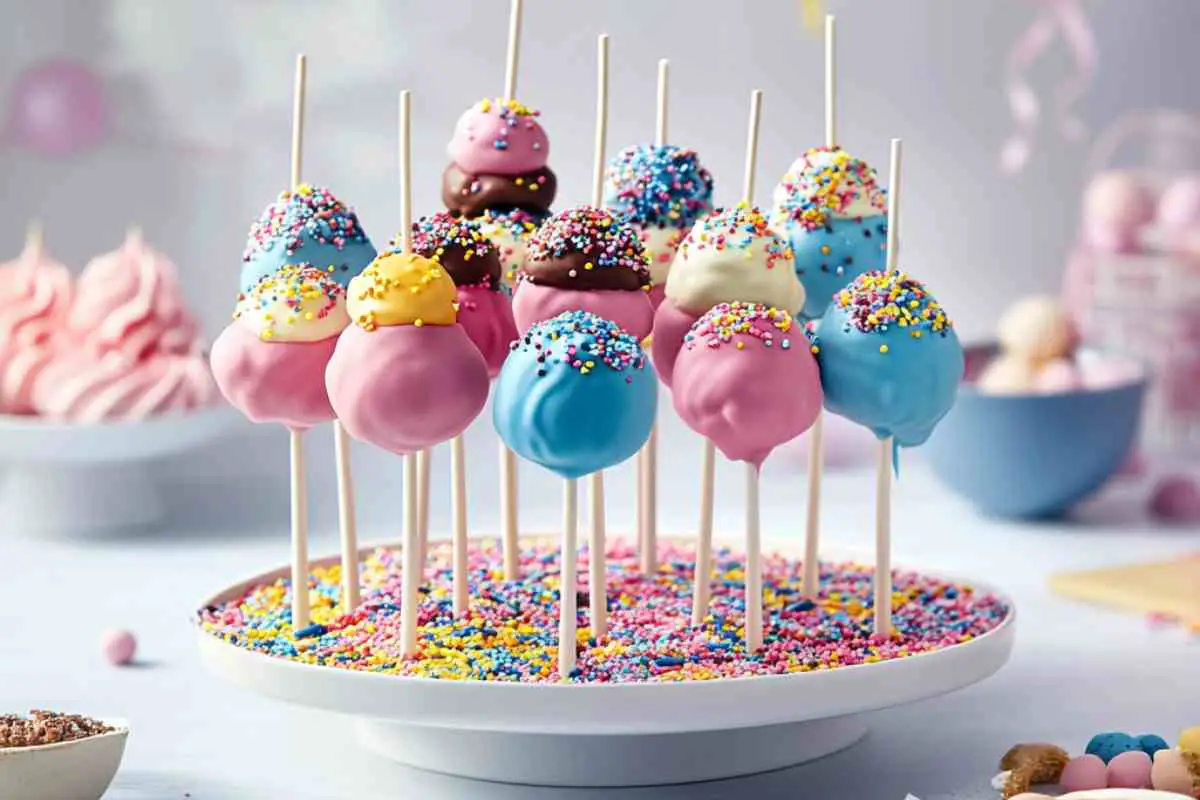
Cake pops are small, round balls of cake that are coated in a layer of melted candy or chocolate. They are typically served on a stick, resembling a lollipop. The cake is crumbled and mixed with frosting, which helps bind the mixture together. This unique combination creates a moist and flavorful treat that is easy to eat and share. Cake pops can be made in various flavors and decorated in countless ways, making them a versatile dessert option.
The Popularity of Cake Pops
The popularity of cake pops has soared in recent years. They first gained fame through social media platforms, where bakers showcased their creative designs. Their small size makes them perfect for parties, as guests can enjoy them without the mess of traditional cake slices. Additionally, cake pops are often seen at weddings, baby showers, and other special events, adding a touch of whimsy to any dessert table. With their fun shapes and vibrant colors, cake pops are not just a treat; they are a delightful experience!
Ingredients for Cake Pops
To create delicious cake pops, you’ll need a few essential ingredients. These ingredients come together to form the base of your cake pops, ensuring they are moist and flavorful. Additionally, there are optional ingredients that can enhance the taste and appearance of your treats. Let’s dive into what you’ll need!
Essential Ingredients for Cake Pops
- Cake Mix: Choose any flavor you love! Chocolate, vanilla, or red velvet are popular choices.
- Eggs: You’ll need three eggs to help bind the cake mix and add moisture.
- Vegetable Oil: Half a cup of vegetable oil keeps the cake moist and tender.
- Water: One cup of water is necessary to mix with the cake ingredients.
- Frosting: One cup of frosting, either store-bought or homemade, is crucial for binding the crumbled cake.
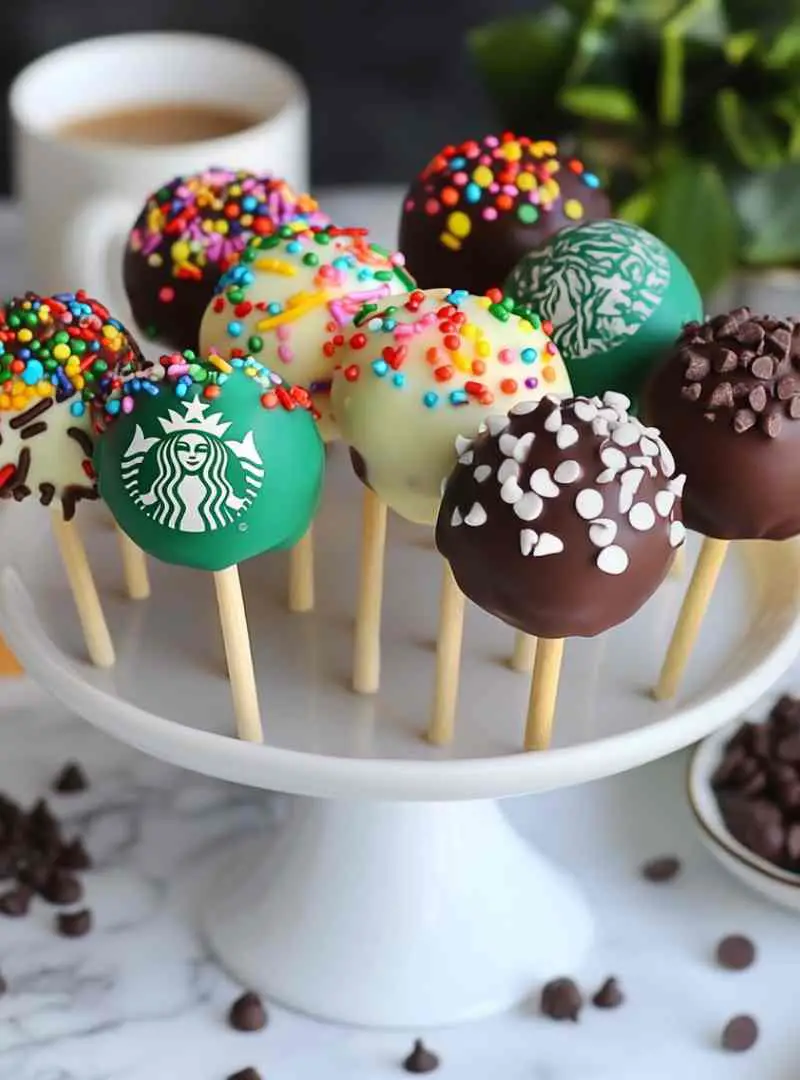
- Candy Melts: These colorful melts are used to coat the cake pops. You can choose various colors to match your theme.
- Lollipop Sticks: These sticks hold your cake pops and make them easy to eat.
Optional Ingredients to Enhance Your Cake Pops
- Sprinkles: Add some fun and color by sprinkling these on top of your cake pops.
- Flavor Extracts: Consider adding vanilla, almond, or mint extract to the cake mix for an extra flavor boost.
- Chocolate Chips: Mix in some chocolate chips for added texture and flavor.
- Edible Glitter: For a touch of sparkle, sprinkle some edible glitter on your cake pops.
With these ingredients, you’re well on your way to making delightful cake pops that everyone will love. The combination of flavors and colors will surely impress your guests!
Step-by-Step Preparation of Cake Pops
Now that you have your ingredients ready, it’s time to dive into the fun part: making your cake pops! Follow these simple steps to create these delightful treats. Each step is easy to follow, ensuring that you’ll have a blast while baking.
Step 1: Bake the Cake
First, preheat your oven according to the instructions on the cake mix box. This is an important step, as a properly heated oven ensures even baking. Next, grease and flour a 9×13-inch baking pan to prevent the cake from sticking. In a large mixing bowl, combine the cake mix, eggs, vegetable oil, and water. Mix everything together until the batter is smooth and well combined. Pour the batter into the prepared pan and bake according to the package instructions. You’ll know the cake is done when a toothpick inserted in the center comes out clean. Once baked, allow the cake to cool completely in the pan. This cooling step is crucial, as it prevents the cake from crumbling too much later on.
Step 2: Crumble the Cake
After the cake has cooled, it’s time to crumble it! Using your hands or a fork, break the cake into fine crumbs in a large mixing bowl. The texture should resemble sand. This step is essential for creating the perfect cake pop consistency. Next, add the frosting to the crumbled cake. Mix everything together until the mixture is well combined. It should hold together when pressed. If it feels too dry, you can add a little more frosting. This mixture is what will give your cake pops their delicious flavor and moist texture.
Step 3: Form the Cake Pops
Now comes the fun part! Take small portions of the cake mixture and roll them into balls, about 1 inch in diameter. Place these balls on a baking sheet lined with parchment paper. This will help keep them from sticking. Once you’ve rolled all the cake mixture into balls, it’s time to chill them. Refrigerate the cake balls for about 30 minutes. This step helps them firm up, making it easier to dip them later.
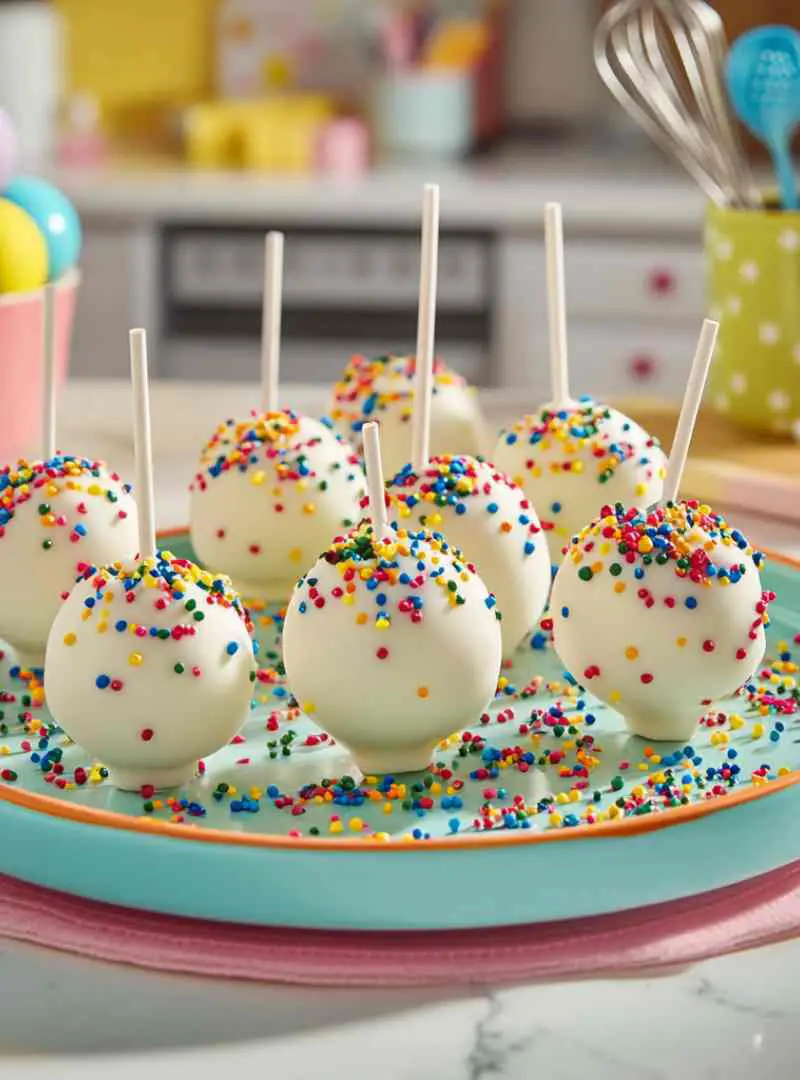
Step 4: Dip and Decorate Cake Pops
After chilling, it’s time to dip your cake pops! Start by melting the candy melts according to the package instructions in a microwave-safe bowl. Make sure to stir them until they are smooth and fully melted. Take a lollipop stick and dip one end into the melted candy. Then, insert it into the center of a cake ball. This helps secure the stick in place. Next, dip the entire cake pop into the melted candy, allowing any excess to drip off. If you want to add sprinkles or other decorations, do it while the candy coating is still wet. Finally, place the finished cake pops upright in a styrofoam block or a cake pop stand to set. This will help them maintain their shape while the coating hardens. And there you have it! Your delicious cake pops are ready to be enjoyed!
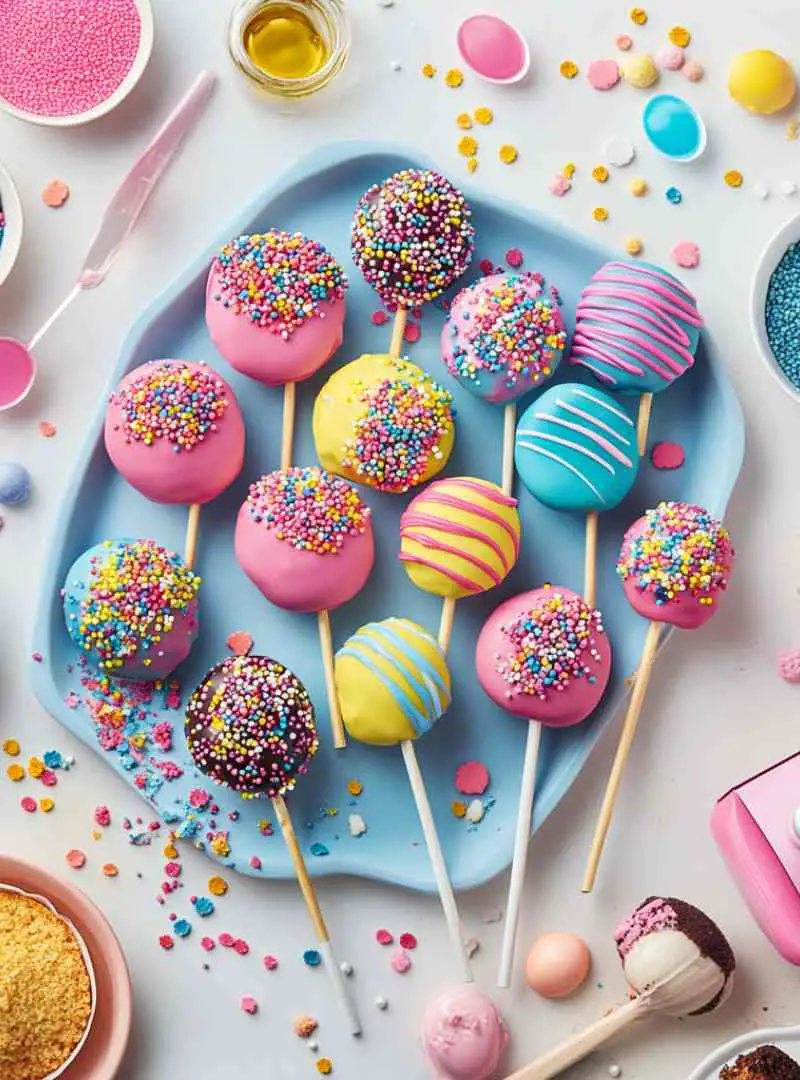
Variations of Cake Pops
Cake pops are incredibly versatile, allowing you to experiment with different flavors and decorations. Whether you want to try a new taste or create a unique look, there are endless possibilities. Let’s explore some exciting flavor variations and decorating ideas for your cake pops!
Flavor Variations for Cake Pops
- Chocolate Cake Pops: Use chocolate cake mix and chocolate frosting for a rich, decadent treat. You can also add chocolate chips for extra texture.
- Red Velvet Cake Pops: This classic flavor is perfect for special occasions. Pair red velvet cake with cream cheese frosting for a delicious combination.
- Funfetti Cake Pops: Add colorful sprinkles to your vanilla cake mix for a festive touch. This flavor is great for birthdays and celebrations!
- Carrot Cake Pops: Use carrot cake mix and cream cheese frosting for a unique twist. You can even add crushed nuts for added crunch.
- Lemon Cake Pops: For a refreshing option, use lemon cake mix and lemon frosting. This bright flavor is perfect for spring and summer gatherings.
These flavor variations can make your cake pops stand out at any event. Feel free to mix and match flavors to create your own signature cake pops!
Decorating Ideas for Cake Pops
- Colorful Drizzles: After dipping your cake pops, drizzle contrasting colors of melted candy over the top for a fun design.
- Themed Decorations: Use themed sprinkles or edible images to match your cake pops to the occasion, like hearts for Valentine’s Day or stars for a birthday.
- Chocolate Coating: Instead of candy melts, try coating your cake pops in melted chocolate for a richer flavor. You can use dark, milk, or white chocolate.
- Textured Coatings: Roll your dipped cake pops in crushed nuts, coconut flakes, or graham cracker crumbs for added texture and flavor.
- Personalized Toppers: Use small flags or toppers with messages to make your cake pops even more special for events.
With these decorating ideas, you can turn your cake pops into eye-catching treats that everyone will love. Get creative and have fun with your designs!
Cooking Note for Cake Pops
Making cake pops can be a fun and rewarding experience. However, there are a few tips to keep in mind to ensure your cake pops turn out perfectly every time. These tips will help you avoid common pitfalls and achieve the best results. Let’s explore some essential tips for perfectly baked cake pops!
Tips for Perfectly Baked Cake Pops
- Use Fresh Ingredients: Always check the expiration dates on your cake mix and frosting. Fresh ingredients will yield better flavor and texture.
- Don’t Overmix: When combining the cake mix and wet ingredients, mix just until combined. Overmixing can lead to a dense cake.
- Cool Completely: Make sure your cake is completely cooled before crumbling. This prevents excess moisture, which can make the cake pops too wet.
- Chill the Cake Balls: Refrigerating the cake balls for at least 30 minutes is crucial. This helps them hold their shape when dipped in candy melts.
- Temperature Control: When melting candy melts, do it in short intervals in the microwave. Stir in between to avoid overheating, which can cause the melts to seize.
- Practice Dipping: If you’re new to dipping, practice with a few test cake pops first. This will help you get the hang of the technique before doing the final ones.
- Use a Styrofoam Block: To set your cake pops, use a styrofoam block or a cake pop stand. This keeps them upright and prevents them from rolling around.
By following these tips, you’ll be well on your way to creating delicious and visually appealing cake pops. Remember, practice makes perfect, so don’t hesitate to experiment and have fun in the kitchen!
Serving Suggestions for Cake Pops
Once you’ve made your delightful cake pops, it’s time to think about how to serve them! Cake pops are not only tasty but also visually appealing, making them a great addition to any gathering. Here are some creative ways to serve your cake pops and pair them with other treats for a memorable dessert experience.
Creative Ways to Serve Cake Pops
- Party Favors: Wrap individual cake pops in clear cellophane bags and tie them with colorful ribbons. This makes for a sweet party favor that guests can take home.
- Cake Pop Bouquets: Arrange your cake pops in a decorative vase or container filled with foam. This creates a beautiful centerpiece for your table.
- Themed Displays: Create a themed display by matching the colors and decorations of your cake pops to the event. For example, use pastel colors for a baby shower or bright colors for a birthday party.
- Interactive Dessert Bar: Set up a cake pop decorating station where guests can add their own toppings and sprinkles. This adds an interactive element to your dessert table.
- Seasonal Displays: For holidays, decorate your cake pops to match the season. Use red and green for Christmas or orange and black for Halloween.
Pairing Cake Pops with Other Treats
- Milk or Hot Chocolate: Serve cake pops alongside a glass of milk or a warm cup of hot chocolate. This classic pairing is sure to please both kids and adults.
- Cupcakes: Offer a variety of cupcakes alongside your cake pops. This way, guests can enjoy both treats and choose their favorites.
- Fruit Skewers: Balance the sweetness of cake pops with fresh fruit skewers. The refreshing taste of fruit complements the rich flavors of the cake pops.
- Ice Cream: Create a dessert platter with cake pops and small scoops of ice cream. This combination is a delightful way to satisfy any sweet tooth.
- Cookies: Pair your cake pops with a selection of cookies. This variety will give guests plenty of options to enjoy.
With these serving suggestions, your cake pops will not only taste amazing but also look fantastic at any event. Get creative and enjoy the process of sharing these delightful treats with friends and family!
Tips for Making the Best Cake Pops
Creating cake pops can be a fun and rewarding experience, but there are some common pitfalls to watch out for. By avoiding these mistakes, you can ensure that your cake pops turn out perfectly every time. Let’s explore some common mistakes to avoid and helpful storage tips to keep your cake pops fresh!
Common Mistakes to Avoid with Cake Pops
- Using Warm Cake: One of the biggest mistakes is using warm cake for crumbling. Always let your cake cool completely. Warm cake can lead to a mushy texture.
- Too Much Frosting: Adding too much frosting can make the mixture overly wet. Start with a small amount and add more only if needed.
- Not Chilling the Cake Balls: Skipping the chilling step can result in cake pops that fall apart when dipped. Always refrigerate for at least 30 minutes.
- Overheating Candy Melts: Melting candy melts too quickly can cause them to seize. Melt in short intervals and stir frequently to keep them smooth.
- Improper Dipping Technique: Dipping too quickly can lead to uneven coating. Take your time and allow excess candy to drip off before setting.
- Not Using a Styrofoam Block: Failing to use a styrofoam block or cake pop stand can cause your cake pops to fall over. Always have a stable base for drying.
By being mindful of these common mistakes, you can create cake pops that are not only delicious but also visually appealing. Remember, practice makes perfect, so don’t be discouraged if your first batch isn’t flawless!
Storage Tips for Cake Pops
Once you’ve made your cake pops, you’ll want to store them properly to keep them fresh. Here are some helpful storage tips:
- Room Temperature: If you plan to eat your cake pops within a few days, you can store them at room temperature. Keep them in an airtight container to prevent them from drying out.
- Refrigeration: For longer storage, place your cake pops in the refrigerator. They can last up to a week when stored this way. Just make sure they are in a sealed container.
- Freezing: If you want to keep your cake pops for an extended period, you can freeze them. Wrap each cake pop in plastic wrap and place them in a freezer-safe bag. They can last up to three months in the freezer.
- Thawing: When you’re ready to enjoy frozen cake pops, let them thaw in the refrigerator overnight. Avoid thawing at room temperature to prevent condensation.
By following these storage tips, you can enjoy your cake pops at their best, whether you’re serving them at a party or enjoying them as a sweet treat at home!
Breakdown of Time for Cake Pops
Understanding the time it takes to make cake pops can help you plan your baking session better. From preparation to cooking, knowing the time breakdown ensures you’re ready for a fun and delicious experience. Let’s take a closer look at the time involved in making these delightful treats!
Prep Time for Cake Pops
The prep time for cake pops is approximately 20 minutes. This includes gathering your ingredients, mixing the cake batter, and preparing the baking pan. It’s a straightforward process that sets the stage for the delicious cake pops to come. Make sure to have everything ready before you start, as this will make the process smoother and more enjoyable!
Cooking Time for Cake Pops
Cooking time for cake pops is about 30 minutes. This time is primarily spent baking the cake. Once the cake is in the oven, you can relax or clean up your workspace. Just keep an eye on the clock, so you can check for doneness with a toothpick. Remember, the cake needs to cool completely before you can crumble it, which is an essential step in making your cake pops.
Total Time for Cake Pops
The total time for making cake pops is around 1 hour and 20 minutes. This includes the prep time, cooking time, and the chilling time for the cake balls. Chilling is crucial, as it helps the cake pops hold their shape during dipping. While it may seem like a bit of a wait, the end result is well worth it! You’ll have a batch of delicious cake pops ready to impress your friends and family.
Nutritional Information for Cake Pops
When indulging in cake pops, it’s essential to be aware of their nutritional content. While these treats are delicious, understanding their calories, protein, and sodium levels can help you enjoy them in moderation. Let’s break down the nutritional information for cake pops!
Calories in Cake Pops
On average, a single cake pop contains about 150 to 200 calories. This number can vary based on the ingredients used, such as the type of cake mix and frosting. For instance, chocolate cake pops may have slightly more calories than vanilla ones. If you’re watching your calorie intake, consider enjoying one or two cake pops as a treat rather than indulging in several at once.
Protein Content in Cake Pops
Cake pops are not a significant source of protein. Typically, each cake pop contains around 2 to 3 grams of protein. This is mainly due to the eggs used in the cake mix. If you’re looking to boost the protein content, consider pairing your cake pops with a glass of milk or adding protein-rich ingredients like nuts or seeds to the cake mixture.
Sodium Levels in Cake Pops
The sodium content in cake pops can range from 100 to 200 milligrams per pop, depending on the frosting and cake mix used. Store-bought frosting often contains higher sodium levels compared to homemade options. If you’re concerned about sodium intake, opt for low-sodium cake mixes and make your frosting from scratch to control the ingredients better. By keeping these nutritional facts in mind, you can enjoy your cake pops while being mindful of your dietary choices. Remember, moderation is key, and these delightful treats can be part of a balanced diet!
FAQs About Cake Pops
How long do cake pops last?
Cake pops can last for about 5 to 7 days when stored properly. If kept at room temperature, make sure they are in an airtight container to prevent them from drying out. If you choose to refrigerate them, they can stay fresh for up to a week. Just remember to seal them well to maintain their delicious flavor and texture!
Can I freeze cake pops?
Yes, you can freeze cake pops! They freeze very well and can last for up to three months in the freezer. To freeze, wrap each cake pop in plastic wrap and place them in a freezer-safe bag. When you’re ready to enjoy them, let them thaw in the refrigerator overnight. Avoid thawing at room temperature to prevent condensation from forming on the coating.
What is the best way to store cake pops?
The best way to store cake pops depends on how soon you plan to eat them. For short-term storage, keep them at room temperature in an airtight container. If you want to keep them fresh for a longer time, refrigerate them in a sealed container. For extended storage, freezing is the way to go. Just remember to wrap them well to protect them from freezer burn!
Can I use different types of frosting for cake pops?
Absolutely! You can use any type of frosting you like for your cake pops. Whether it’s buttercream, cream cheese, or even whipped frosting, each type will give your cake pops a unique flavor. Just keep in mind that the consistency of the frosting is important. It should be thick enough to help bind the cake crumbs together without making the mixture too wet.
Conclusion on Cake Pops
In conclusion, cake pops are a delightful and versatile treat that can bring joy to any occasion. They are not only fun to make but also allow for endless creativity in flavors and decorations. Whether you’re celebrating a birthday, hosting a baby shower, or simply enjoying a sweet treat at home, cake pops are sure to impress your guests and satisfy your sweet tooth.
Final Thoughts on Making Cake Pops
Making cake pops can be a rewarding experience. With just a few simple steps, you can transform a basic cake into a fun and delicious dessert. Remember to follow the tips provided to avoid common mistakes and ensure your cake pops turn out perfectly. The joy of creating these treats lies in the process, so don’t hesitate to experiment with flavors and decorations. Each batch can be a new adventure!
Encouragement to Try Making Cake Pops
If you haven’t tried making cake pops yet, now is the perfect time to start! Gather your ingredients, invite some friends or family to join you, and have fun in the kitchen. The smiles and laughter that come from creating and sharing these delightful treats are truly priceless. So roll up your sleeves, get creative, and enjoy the sweet satisfaction of making your very own cake pops!

Cake Pops
Ingredients
Equipment
Method
-
Preheat your oven according to the instructions on the cake mix box. Grease and flour a 9x13-inch baking pan.
-
In a large mixing bowl, combine the cake mix, eggs, vegetable oil, and water. Mix until smooth. Pour into the prepared pan and bake according to package instructions. Allow to cool completely.
-
Crumble the cooled cake into fine crumbs in a large mixing bowl. Add the frosting and mix until well combined. The mixture should hold together when pressed.
-
Roll the mixture into 1-inch balls and place on a baking sheet lined with parchment paper. Refrigerate for 30 minutes to firm up.
-
Melt the candy melts according to package instructions. Dip one end of a lollipop stick into the melted candy, then insert it into the center of a cake ball.
-
Dip the entire cake pop into the melted candy, allowing excess to drip off. Decorate with sprinkles or other toppings while the coating is still wet.
-
Place the finished cake pops upright in a styrofoam block or cake pop stand to set.