Baking is more than just a task; it’s a celebration of flavors, creativity, and love. When I think of special occasions, a beautifully decorated sponge cake always comes to mind. This delightful treat is not only light and fluffy but also incredibly versatile, making it perfect for birthdays, anniversaries, or any gathering that calls for a sweet touch. The joy of layering whipped cream and fresh fruits on a sponge cake is unmatched, and it transforms any event into a memorable feast.
What I love most about this recipe is its simplicity. With just a handful of ingredients, you can create a stunning centerpiece that will impress your guests. The sponge cake itself is a blank canvas, ready to be adorned with your favorite flavors and decorations. Whether you choose to go classic with strawberries and chocolate shavings or get creative with seasonal fruits, the possibilities are endless.
Join me on this baking adventure, and let’s make a decorated sponge cake that will not only satisfy your sweet tooth but also bring smiles to everyone around the table. Trust me, once you master this recipe, it will become your go-to for every celebration!
Ingredients List
- 4 large eggs
- 1 cup granulated sugar
- 1 cup all-purpose flour
- 1 teaspoon baking powder
- 1/4 teaspoon salt
- 1/4 cup unsalted butter, melted
- 1 teaspoon vanilla extract
- 1/4 cup milk
- 1 cup heavy whipping cream
- 2 tablespoons powdered sugar
- 1 teaspoon vanilla extract
- Fresh fruits (such as strawberries, blueberries, or any preferred fruits)
- Chocolate shavings or sprinkles (optional)
How to Prepare Decorated Sponge Cake
Preheat and Prepare
Let’s kick things off by preheating your oven to 350°F (175°C). This step is crucial because a properly heated oven ensures even baking. While that’s warming up, grab your two 9-inch round cake pans. Grease them generously with unsalted butter or cooking spray, then dust them lightly with flour. This will help the cakes release easily once they’re baked. Trust me, there’s nothing worse than a cake that sticks to the pan!
Mixing the Batter
Now, let’s get to the fun part—mixing the batter! In a large mixing bowl, beat the 4 large eggs and 1 cup of granulated sugar together using an electric mixer on high speed. You want to whip this mixture until it becomes thick and pale, which usually takes about 5-7 minutes. This step is key for a light and airy sponge cake.
In a separate bowl, sift together 1 cup of all-purpose flour, 1 teaspoon of baking powder, and 1/4 teaspoon of salt. Gently fold this dry mixture into the egg mixture until just combined. Be careful not to overmix; we want to keep that airiness! Finally, drizzle in 1/4 cup of melted butter, 1 teaspoon of vanilla extract, and 1/4 cup of milk. Fold everything together until the batter is smooth and well combined.
Baking the Cake
Time to bake! Divide the batter evenly between the prepared cake pans. Slide them into your preheated oven and bake for 25-30 minutes. To check for doneness, insert a toothpick into the center of the cakes; if it comes out clean, they’re ready! Once baked, let the cakes cool in the pans for about 10 minutes. After that, carefully transfer them to wire racks to cool completely. This cooling step is essential for a perfect texture.
Whipping the Cream
While the cakes are cooling, let’s whip up some cream! In a mixing bowl, combine 1 cup of heavy whipping cream, 2 tablespoons of powdered sugar, and 1 teaspoon of vanilla extract. Using an electric mixer, whip the cream on medium-high speed until stiff peaks form. For the best results, make sure your mixing bowl and beaters are cold. This helps the cream whip up beautifully!
Assembling the Cake
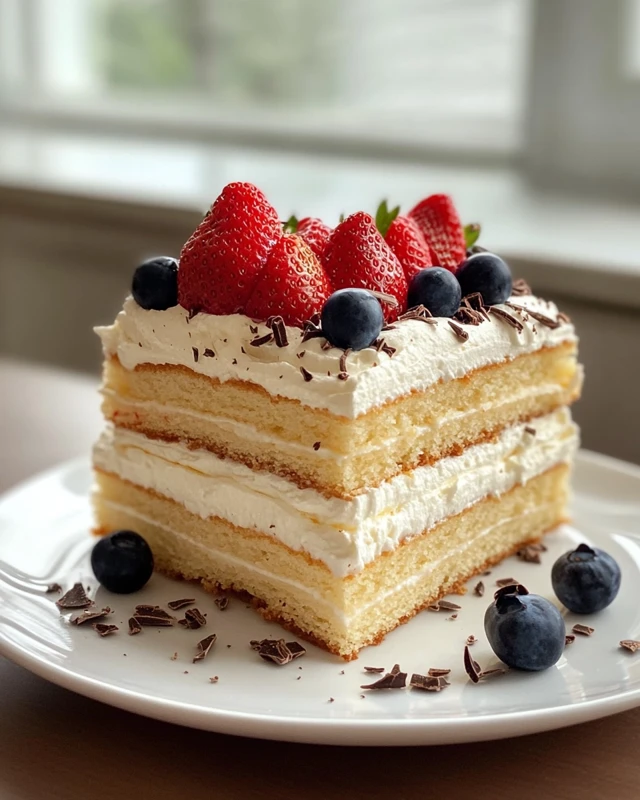
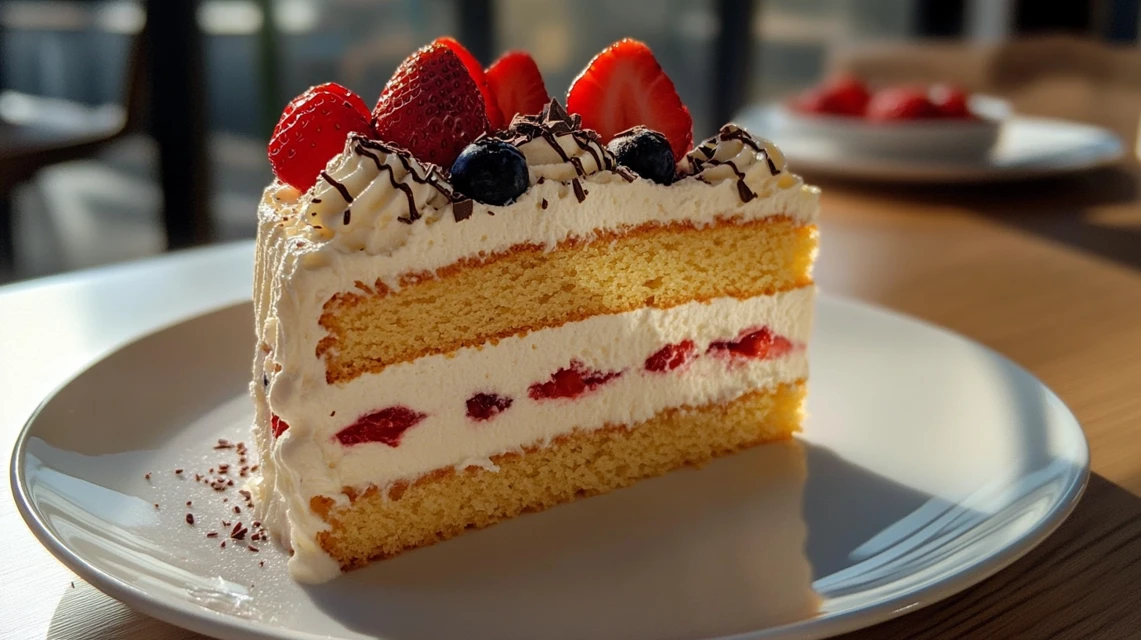
Once your sponge cakes are completely cooled, it’s time to assemble! Place one layer on a serving plate and spread a generous layer of whipped cream on top. Then, gently place the second cake layer on top of the whipped cream. Spread the remaining whipped cream over the top and sides of the cake. Now comes the fun part—decorate with fresh fruits and, if you like, sprinkle some chocolate shavings or sprinkles for that extra flair. Make sure to spread evenly for a beautiful presentation!
Tips for Success with Decorated Sponge Cake
Creating a stunning decorated sponge cake is all about the details. Here are some tips that I’ve gathered from my own baking adventures to help you achieve perfection:
- Use Fresh Ingredients: Always opt for fresh eggs and high-quality vanilla extract. The flavor of your cake depends on the quality of your ingredients.
- Room Temperature Eggs: For the best results, use eggs that are at room temperature. They whip up better and help create a fluffier cake.
- Don’t Overmix: When combining the dry and wet ingredients, mix just until combined. Overmixing can lead to a dense cake, and we want it light and airy!
- Check Oven Temperature: Ovens can vary in temperature. Use an oven thermometer to ensure yours is accurate. This can make a big difference in baking time and cake texture.
- Cool Completely: Make sure your cakes are completely cool before decorating. This prevents the whipped cream from melting and sliding off.
- Get Creative with Decorations: Don’t be afraid to experiment! Use seasonal fruits, edible flowers, or even a drizzle of chocolate ganache for a unique touch.
- Practice Makes Perfect: If your first attempt doesn’t turn out as expected, don’t be discouraged. Baking is a learning process, and each cake is a step toward mastering your skills!
With these tips in your back pocket, you’ll be well on your way to impressing your friends and family with a beautifully decorated sponge cake that tastes as good as it looks!
Nutritional Information
Understanding the nutritional content of your decorated sponge cake can help you enjoy it mindfully. Here’s a breakdown of the estimated values per serving (1 slice):
- Calories: 250
- Fat: 12g
- Saturated Fat: 7g
- Unsaturated Fat: 3g
- Trans Fat: 0g
- Cholesterol: 80mg
- Sodium: 150mg
- Carbohydrates: 30g
- Fiber: 1g
- Sugar: 15g
- Protein: 4g
Keep in mind that these values are estimates and can vary based on the specific ingredients you use. Enjoy your baking and feel free to adjust the recipe to suit your dietary needs!
FAQ Section
As you embark on your journey to create the perfect decorated sponge cake, you might have a few questions. Here are some common queries I’ve encountered, along with my answers to help you out:
How do I store leftover decorated sponge cake?
To keep your cake fresh, store any leftovers in an airtight container in the refrigerator. This will help maintain its moisture and flavor. If you have a lot of cake left, you can also wrap individual slices in plastic wrap for easy access later!
Can I substitute ingredients in the recipe?
Absolutely! If you’re looking for alternatives, here are a few suggestions:
- Eggs: You can use flaxseed meal or applesauce as a substitute for eggs if you’re looking for a vegan option.
- Flour: For a gluten-free version, try using a gluten-free all-purpose flour blend.
- Milk: Almond milk or coconut milk can be used instead of regular milk for a dairy-free option.
What fruits work best for decorating?
Fresh fruits are a fantastic way to add color and flavor to your cake. I love using strawberries, blueberries, and raspberries. You can also try kiwi, peaches, or even edible flowers for a unique touch!
Can I freeze the sponge cake?
Yes, you can freeze the sponge cake! Just make sure it’s completely cooled before wrapping it tightly in plastic wrap and placing it in a freezer-safe bag. It can last up to three months in the freezer. When you’re ready to enjoy it, let it thaw in the refrigerator overnight.
How can I make my cake more flavorful?
To enhance the flavor of your decorated sponge cake, consider adding citrus zest, such as lemon or orange, to the batter. You can also infuse the whipped cream with a splash of flavored extract, like almond or coconut, for an extra kick!
With these tips and answers, you’re well-equipped to tackle any challenges that come your way while making your decorated sponge cake. Happy baking!
Why You’ll Love This Recipe
This decorated sponge cake is not just a dessert; it’s a celebration on a plate! Here are some reasons why you’ll adore making this cake:
- Easy to Make: With simple ingredients and straightforward steps, even novice bakers can create a stunning cake.
- Light and Fluffy: The sponge cake is airy and soft, making it a delightful treat that melts in your mouth.
- Customizable: You can personalize it with your favorite fruits, flavors, and decorations, making it perfect for any occasion.
- Perfect for Celebrations: Whether it’s a birthday, anniversary, or just a family gathering, this cake adds a festive touch to any event.
- Impressive Presentation: The vibrant colors of fresh fruits and the smooth whipped cream create a visually stunning dessert that will wow your guests.
- Great for Leftovers: This cake stays delicious for days, making it a fantastic option for meal prep or enjoying throughout the week.
With all these benefits, it’s no wonder this decorated sponge cake has become a staple in my kitchen. I can’t wait for you to experience the joy of baking and sharing it with your loved ones!
Storage & Reheating Instructions
After creating your beautiful decorated sponge cake, you might find yourself with some delicious leftovers. Here’s how to store and reheat your cake to keep it fresh and tasty:
Storing Leftovers
To maintain the cake’s moisture and flavor, follow these simple steps:
- Cool Completely: Ensure your cake is completely cooled before storing. This prevents condensation from forming, which can make the cake soggy.
- Airtight Container: Place any leftover cake in an airtight container. This will help keep it fresh for up to 3-4 days in the refrigerator.
- Wrap Individual Slices: If you prefer, wrap individual slices in plastic wrap. This makes it easy to grab a piece whenever you want a sweet treat!
Reheating the Cake
If you want to enjoy your cake warm, here’s how to reheat it without losing its delightful texture:
- Microwave: Place a slice on a microwave-safe plate and cover it with a damp paper towel. Heat for about 10-15 seconds. Check to see if it’s warm enough; if not, continue in 5-second intervals.
- Oven: Preheat your oven to 350°F (175°C). Wrap the cake in aluminum foil to prevent it from drying out. Heat for about 10-15 minutes, or until warmed through.
By following these storage and reheating tips, you can enjoy your decorated sponge cake days after baking it, keeping the flavors and textures just as delightful as when it was first made. Happy indulging!


Decorated Sponge Cake: 5 Irresistible Tips for Perfection
- Total Time: 50 minutes
- Yield: 8 servings 1x
- Diet: Vegetarian
Description
A delightful treat for any celebration.
Ingredients
- 4 large eggs
- 1 cup granulated sugar
- 1 cup all-purpose flour
- 1 teaspoon baking powder
- 1/4 teaspoon salt
- 1/4 cup unsalted butter, melted
- 1 teaspoon vanilla extract
- 1/4 cup milk
- 1 cup heavy whipping cream
- 2 tablespoons powdered sugar
- 1 teaspoon vanilla extract
- Fresh fruits (strawberries, blueberries, or any preferred fruits)
- Chocolate shavings or sprinkles (optional)
Instructions
- Preheat your oven to 350°F (175°C). Grease and flour two 9-inch round cake pans.
- In a large mixing bowl, beat the eggs and granulated sugar together using an electric mixer on high speed until the mixture is thick and pale, about 5-7 minutes.
- In a separate bowl, sift together the flour, baking powder, and salt.
- Gently fold the dry ingredients into the egg mixture until just combined.
- Drizzle in the melted butter, vanilla extract, and milk. Carefully fold until the batter is smooth and well combined.
- Divide the batter evenly between the prepared cake pans. Bake for 25-30 minutes, or until a toothpick inserted into the center comes out clean. Allow the cakes to cool in the pans for 10 minutes, then transfer to wire racks to cool completely.
- In a mixing bowl, combine the heavy whipping cream, powdered sugar, and vanilla extract. Using an electric mixer, whip the cream on medium-high speed until stiff peaks form.
- Once the sponge cakes are completely cooled, place one layer on a serving plate. Spread a generous layer of whipped cream on top.
- Place the second cake layer on top of the whipped cream.
- Spread the remaining whipped cream over the top and sides of the cake. Decorate with fresh fruits and sprinkle with chocolate shavings or sprinkles if desired.
Notes
- Ensure cakes are completely cooled before decorating.
- Use your favorite fruits for decoration.
- Prep Time: 20 minutes
- Cook Time: 30 minutes
- Category: Dessert
- Method: Baking
- Cuisine: General
Nutrition
- Serving Size: 1 slice
- Calories: 250
- Sugar: 15g
- Sodium: 150mg
- Fat: 12g
- Saturated Fat: 7g
- Unsaturated Fat: 3g
- Trans Fat: 0g
- Carbohydrates: 30g
- Fiber: 1g
- Protein: 4g
- Cholesterol: 80mg